Kernel Compilation and Installation
Written by Rodrigo Siqueira
Written on , last modified onIn this tutorial, we will learn how to compile and install the Linux Kernel by using Linus Torvalds tree. We expect that you already have a virtual machine (preferably QEMU) available.
Command Summary
If you did not read this tutorial yet, skip this section. I added this section as a summary for someone that already read this tutorial and just want to remember a specific command.
Follows the command list employed in this tutorial:
→ .config manipulations:
# @VM
zcat /proc/config.gz > .config
or
# @VM
cp /boot/config-`uname -r` .config
→ Change into the .config file:
# @HOST
make nconfig # or make menuconfig
# @VM
make olddefconfig
make kvm_guest.config
make localmodconfig
→ Compile:
# @HOST
make ARCH=x86_64 -j8
make modules
→ Install:
# @VM
sudo make modules_install
sudo make headers_install INSTALL_HDR_PATH=/usr
sudo make install
→ Remove:
# @VM
rm -rf /boot/vmlinuz-[TARGET]
rm -rf /boot/initrd-[TARGET]
rm -rf /boot/System-map-[TARGET]
rm -rf /boot/config-[TARGET]
rm -rf /lib/modules/[TARGET]
rm -rf /var/lib/initramfs/[TARGET]
Note
In this tutorial we will work inside and outside of a VM, for simplicity sake, we will add the following comment on top of each command:
@VM: Execute the command inside the VM.@HOST: Execute the command in your machine.
Introduction
In this tutorial, we will take a look on how to compile and install the Linux Kernel inside of a Virtual Machine (VM) and in a computer. Nevertheless, 99% of the steps described in this tutorial are generic for VM and Host machine. Figure 1 illustrates the full workflow by using a VM and the host machine; notice that using a VM is safer and more flexible. If you want to install a new kernel version in your current Linux distro, you basically have all the elements in Figure 1 on your main computer.
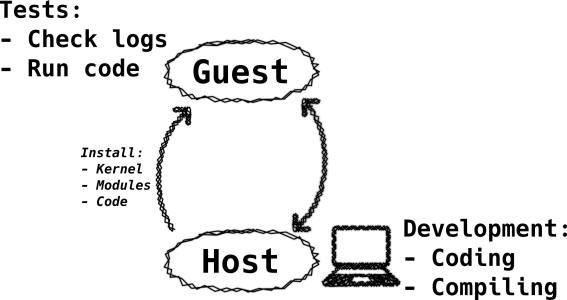
Straightforwardly, follows what we want to do in each target:
- Host:
- Compile Linux
- Coding
- VM:
- Install custom Linux
- Test changes
- Run any test code
- Take a look at the logs
We will focus on Debian and Arch Linux machine. During the compilation
processes, we need some packages in the system; you have to find the following
packages: grub, bison, flex, openssh, ncurses, and
base-devel/build-essential.
Choose Your Weapon
Nowadays we have multiple options for conducting experiments with the Linux Kernel. For simplicity sake, I classify the available approaches into three broad areas: virtualization, desktop/laptop, and embedded devices. The virtualization technique is a harmless way to play with the Linux kernel because any fatal mistake has few consequences. For example, if you crash the whole system, you can create another virtual machine or take one of your backups (yes, make a backup of your VMs). Experiments on the host machine (i.e., your computer) are exciting, but also riskier. Any potential problem may break all your system. Lastly, for the embedded devices, you can make tests in a developing kit (e.g., raspberry pi). For this tutorial, we demonstrate how to install Linux on a virtual and in a host machine. We try to highlight any specific operation made inside of a VM and in a host machine.
For this tutorial, we decided to use QEMU to manage our VM. If you want to learn how to make the basic set up with QEMU, I recommend you to read my post about it in “Use Qemu to play with Linux Kernel”. Keep in mind that you can follow the steps described here in the same fashion on your local machine.
One of the first things to learn about Linux is the plurality of the project; Linux is composed of many subprojects each one specialized in one single characteristic, these subprojects are called subsystems. Usually, the maintainer(s) of each subsystem is responsible for receiving patches and deciding whether to apply or refuse them. Later, the maintainer says to Linus Torvalds which branch he should pull. This explanation is an oversimplification of the process; you can find more details in the documentation [1]. It is important to realize that you have to figure out which subsystem you intend to contribute, as well as its repository, and work based on their kernel instance. For example, if you want to contribute to RISC-V subsystem you have to work on Palmer Dabbelt’s repository; if you’re going to help to IIO use Jonathan Cameron’s repository. You can quickly figure out the target repository by looking at the MAINTAINERS file. For this tutorial, we gonna use the Torvalds repository.
git clone git://git.kernel.org/pub/scm/linux/kernel/git/torvalds/linux.git
There are thousands of Linux Kernel forks spread around the Internet, for example, it is easy to find organizations that keep their kernel instance with their specific customizations. Feel free to use it or any instance that you want, but keep in mind that you may face some problems with non-official repositories. I always recommend for newcomers to use the git.kernel.org to get their Linux code and avoid problems.
The Super .config
The .config file holds all the information about what should be compiled or
not during the build process. The .config file has three possible answers per
target: (1) m, (2) y, and (3) n. The “m” character means that the target will
be compiled as a
module; the ‘y’ and ‘n’
designates if the target will be compiled or not as a part of the Kernel image.
Every Linux Distribution (e.g., Arch, Debian, and Fedora) usually maintain and
distribute their own .config file. The distributions .config usually
enables most of the available options (especially the device drivers) because
they have to run in a large variety of hardware. In other words, it means that
the kernel installed in your computer may have several device drivers that you
do not need. Nonetheless, the important thing here is: the more options you
have enabled in the .config file, the longer it will take to compile.
If this is your first time trying to use your own compiled kernel version, I
strongly recommend you to use the .config provided by your operating system
to raise your chances of success. Later, you can expand the modification as we
describe in this tutorial.
Attention:
The .config file has Superpowers, I recommend you to invest some time to
understand it better. Also, keep a backup of your working .config files, you
can save a lot of time by having a trusted .config.
Get your .config File
Depending on the distribution that you’re using, there are two options to get
.config file: (1) /proc or (2) /boot. Both cases produce the same
results, but not all distributions enable the /proc option (e.g., Arch enable
it, but Debian not). The commands below illustrates how to get the .config
for both cases:
ATTENTION:
If you’re going to install the new Kernel on your VM, you have to take
the .config from your running VM. DO NOT TAKE THE .config file from your
host machine, otherwise you can fail to build and install your custom version.
Execute this command inside the Linux Kernel directory previously cloned.
- Get
.configfrom/proc
# @VM
zcat /proc/config.gz > .config
- Get
.configfrom/boot
# @VM
cp /boot/config-`uname -r` .config
Remember, if you are inside the VM you have to bring the .config file from
your VM to your host machine. In the tutorial about QEMU, we explain how to
share a directory between guest and host [13].
Make Your Customizations
Attention:
There is a basic rule about .config file: NEVER CHANGE IT BY HAND, ALWAYS
USE A TOOL
There are several options to change the .config file, I will introduce two:
# @HOST
make nconfig
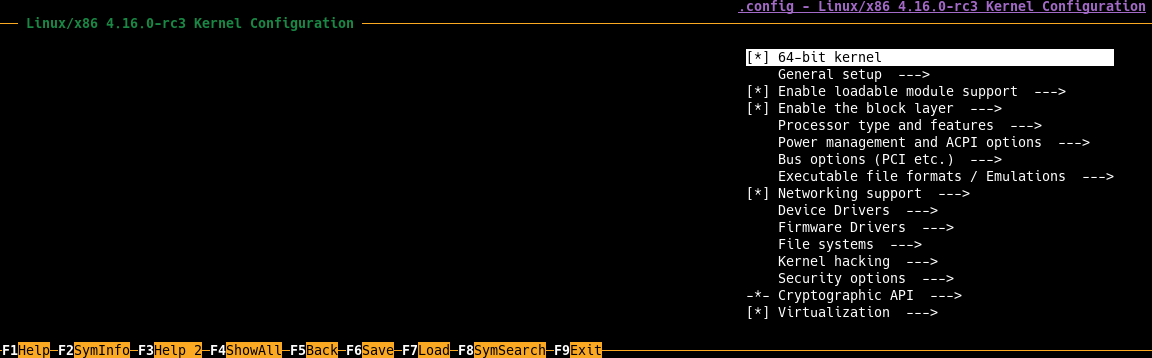
→ nconfig looks like this:
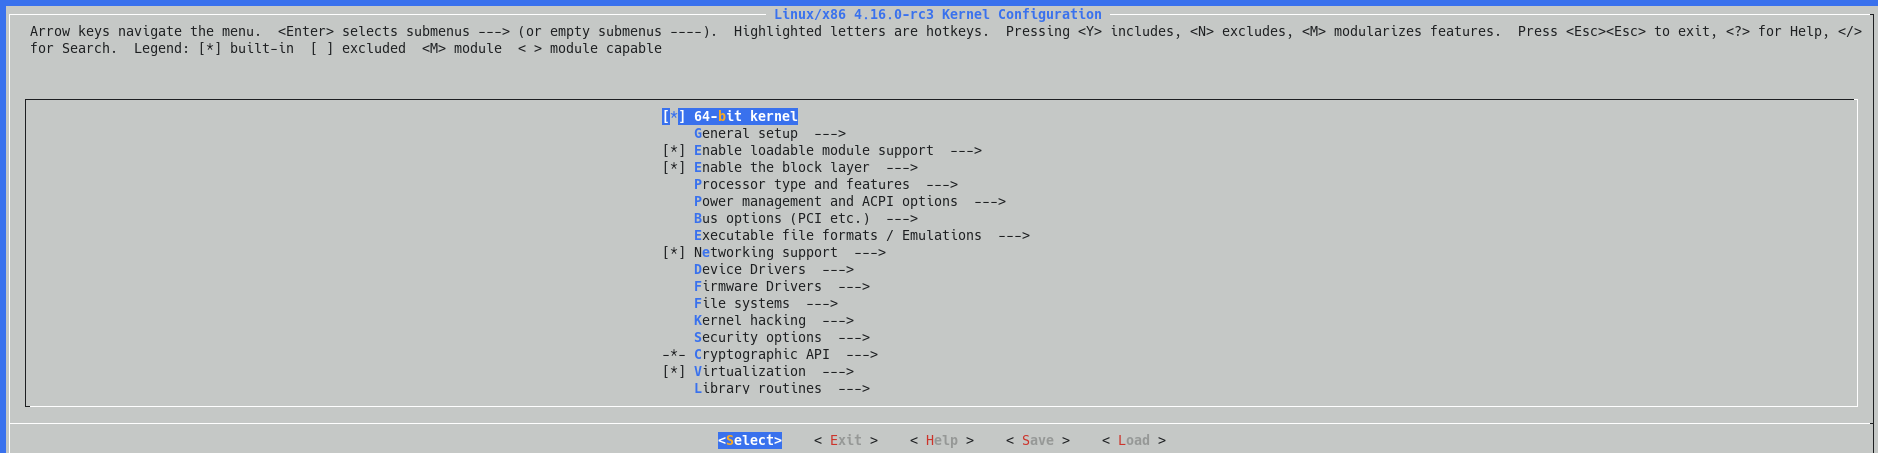
Finally, we have menuconfig:
# @HOST
make menuconfig
→ menuconfig looks like this:
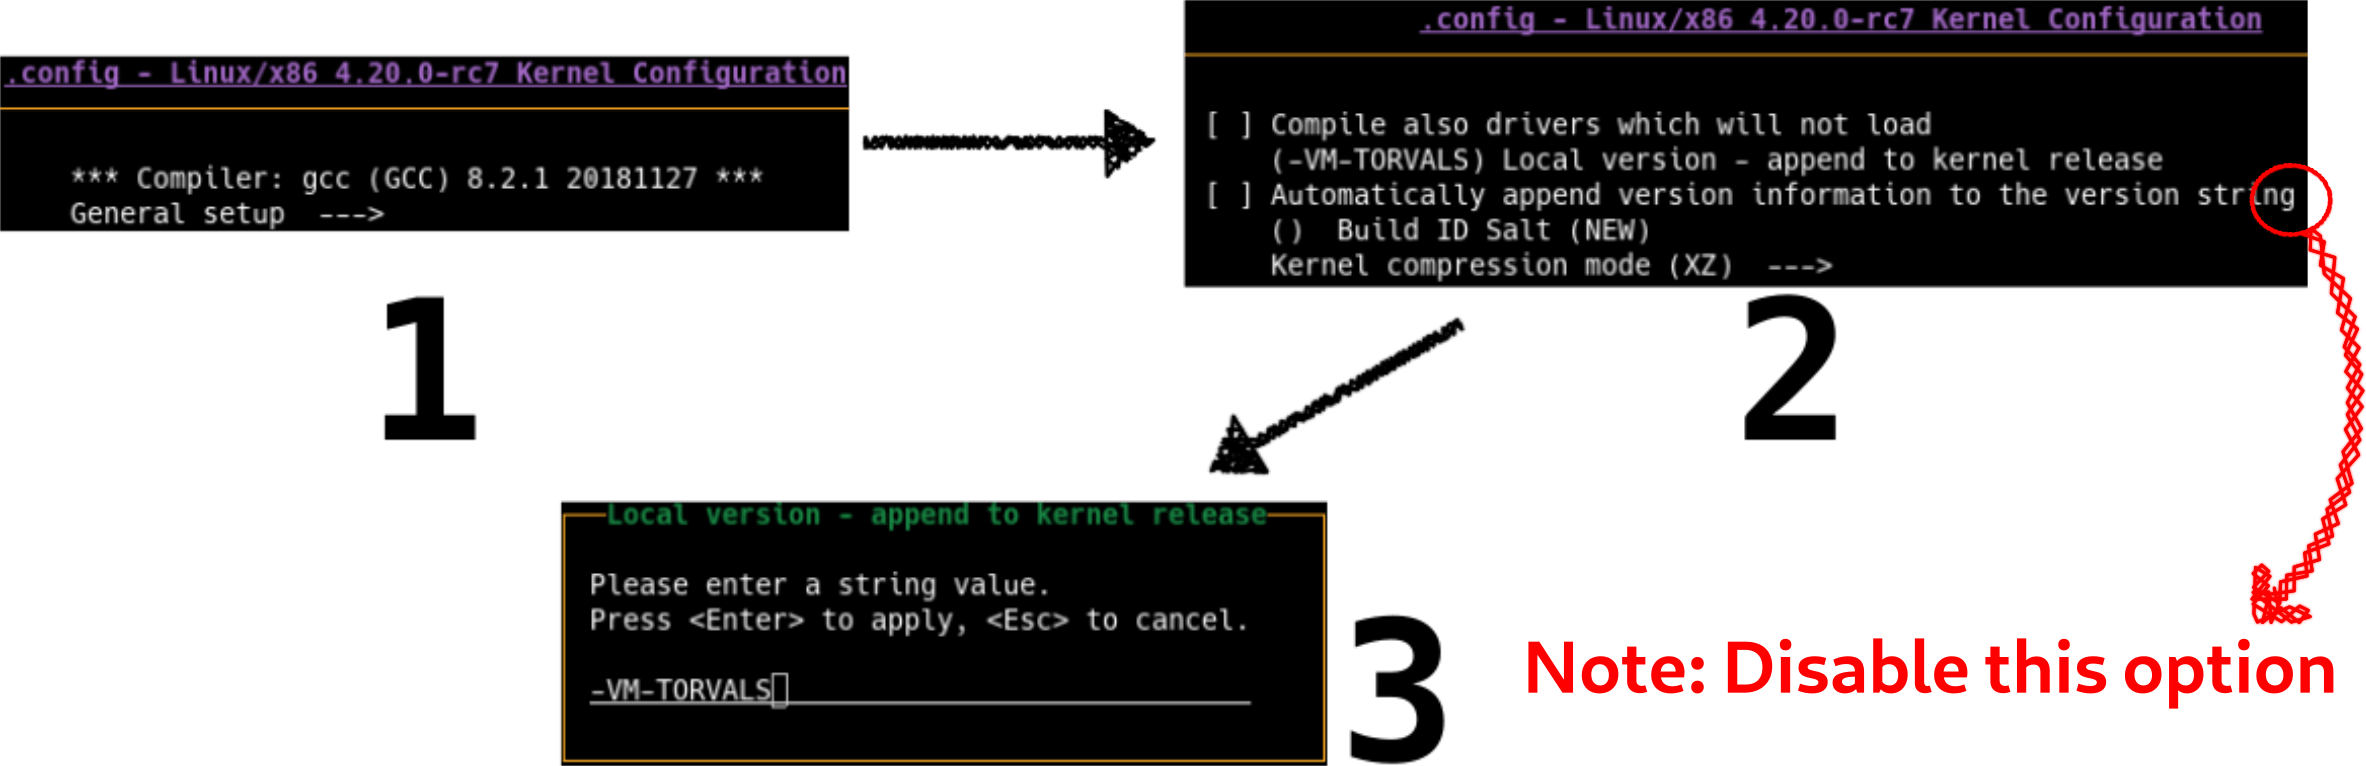
Take some time to navigate to the options and get comfortable with this menu. For this tutorial, we just want to make a tiny change: replace the current kernel name. In the menu, select the following options: General setup → Local version → Replace the name. The figure below illustrates the steps.
Final Considerations About .config and Tips
Attention:
Remember, you have to work with the right .config file. If you are in the VM,
use the commands described here inside the VM. Otherwise, just use it in
your machine.
When you use a configuration file provided by a Distribution, hundreds of
device drivers are enabled; typically, you need a few drivers. All the enabled
drivers will increase the compilation time, and we don’t want that; fortunately,
there is an option that automatically changes the .config to enable only
required drivers for your system. This command looks at all the loaded
module in your system and based on this information it shrinks the .config
file (this command uses lsmod to enable or disable devices drivers in the
.config file). Nonetheless, before using this command, it’s highly recommended
to enable all the devices that you use with your computer to ensure that the
.config has all the required drivers for your machine [8]. In other words, plug all the
devices that you usually use before executing the command:
# @VM
make localmodconfig
Remember:
Before executing make localmodconfig, plug-in all the device that you usually
use to get them enabled in the .config. However, these plug-in steps are only
required if you are in your host machine; you do not need to care about this in
your VM, just execute the command.
Sometimes, when you rebase your local branch with the upstream and start the compilation, you may notice interactive questions regarding new features. Something similar as the figure below:
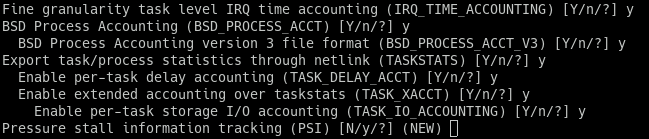
This happens because during the evolution of the Kernel new features are
appended, and these new features were not present in your .config file. As a
result, you are asked to make a decision about what to do with these new features. One way to reduce the amount of
interaction is:
# @VM
make olddefconfig
Finally, one last tip for everyone that is working with QEMU and KVM. There is an option that enables some features for this scenario:
# @VM
make kvm_guest.config
Compile!
Now, it’s timeeeeee! After a bunch of setups, I am quite sure that you are anxious for this part. So, here we go… type:
# @HOST
make -j [numbers_of_threads]
The parameter number_of_threads should be replace by the desired number of
threads to be spawned for compilation. You should use the value that maximizes
the use of your CPU, to get a faster compilation.
As an alternative, you can specify the architecture [9]:
# @HOST
make ARCH=x86_64 -j [numbers_of_threads]
For compiling the kernel modules, type:
# @HOST
make modules
Install your Custom Kernel
It is important to pay attention in the installation order:
- Install modules
- Install header
- Install Image
- Update bootloader (Grub)
Install Modules and Headers
Dangerous Zone: From now on, double your attention in the install steps. You can crash your system.
For installing the modules, type:
# @VM
sudo make modules_install
If you want to check the changes, take a look at /lib/modules/$(uname -r)
This next step is optional and, generally, only required if you make some changes in the core features of the kernel. If you’re working with modules, you don’t need this step; finally, if this is your first installation skip the next command:
# @VM
sudo make headers_install INSTALL_HDR_PATH=/usr
Finally, it is time to install your Kernel image. This step is dependent on the Linux distribution that you’re using. We will show how to install your new kernel image on Debian and ArchLinux.
→ Debian Based Steps
To install the Kernel on Debian, just type:
# @VM
sudo make install
Go to the Grub section.
→ Arch Linux Based Steps
If you use ArchLinux, we introduce the basics steps to install your custom image. You can find a detailed explanation of this processes in the ArchLinux wiki.
First, you have to make a copy of your kernel image to the /boot/ directory
with the command:
# @VM
sudo cp -v arch/x86_64/boot/bzImage /boot/vmlinuz-[NAME]
Replace [NAME] by the same name that you configured for your kernel in the
steps as mentioned earlier – actually, you can use any name you want I just
recommend you to use the same name for keeping things organized. Remember, you
can use any name you want.
Second, you have to create a new mkinitcpio file. Follow the steps below:
- Copy an existing
mkinitcpio
# @VM
sudo cp /etc/mkinitcpio.d/linux.preset /etc/mkinitcpio.d/linux-[NAME].preset
- Open the copied file, look it line by line, replaces the old kernel name by
the new name you assigned when you replaced
[NAME](It must be same that you used when you copied the compiled image to/boot). In the example below, we use[NAME]as torvalds:
# @VM
# mkinitcpio preset file for the 'linux' package

ALL_config="/etc/mkinitcpio.conf"
ALL_kver="/boot/vmlinuz-torvalds"

PRESETS=('default' 'fallback')

#default_config="/etc/mkinitcpio.conf"
default_image="/boot/initramfs-torvalds.img"
#default_options=""

#fallback_config="/etc/mkinitcpio.conf"
fallback_image="/boot/initramfs-torvalds-fallback.img"
fallback_options="-S autodetect"
Attention: Keep in mind that you have to adapt this file by yourself. There is no blind copy and paste here.
# @VM
sudo mkinitcpio -p linux-[name]
Attention:
You have to create a mkinitcpio.conf per kernel that you want to install. If
you just keep updating your kernel image, you don’t need to create new config
file.
Update Grub2
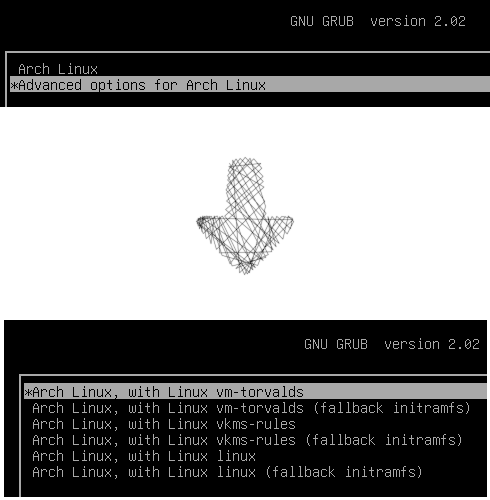
We are reallyyyyy close to finishing the installation. We just have to update the bootloader with the following command:
# @VM
sudo grub-mkconfig -o /boot/grub/grub.cfg
Now, reboot your system and check if everything is ok. You should see some options in your Grub as Figure 6 below illustrates.
Remove
Finally, you may want to remove an old Kernel version for space or organization reasons. First of all, boot in another version of the Kernel and follow the steps below:
# @VM
rm -rf /boot/vmlinuz-[target]
rm -rf /boot/initrd-[target]
rm -rf /boot/System-map-[target]
rm -rf /boot/config-[target]
rm -rf /lib/modules/[target]
rm -rf /var/lib/initramfs/[target]
Acknowledgments
I would like to thanks Charles Oliveira, Matheus Tavares, and Marcelo Schmitt for their reviews and contributions for this tutorial.
History
- V1: Release
- Reviewed-by: Matheus Tavares and Marcelo Schmitt
- V2: Improve highlights
- V3: Update figure labels, Figure 4, and citation
References
[1] “How the development process works”. URL: https://www.kernel.org/doc/html/v4.15/process/2.Process.html. ⤴
[2] “Kernel/Traditional compilation”. URL: https://wiki.archlinux.org/index.php/Kernels/Traditional_compilation. ⤴
[3] “Initial ramdisk”. URL: https://en.wikipedia.org/wiki/Initramfs. ⤴
[4] “Practical stuffs about Initramfs”. URL: http://nairobi-embedded.org/initramfs_tutorial.html. ⤴
[5] Rob Landley. “The problem. (Why root= doesn’t scale.)”. URL: https://landley.net/writing/rootfs-intro.html. ⤴
[6] “Running bzImage in QEMU: Unable to mount root fs on unknown-block(0.0)”. (2012) URL: https://unix.stackexchange.com/questions/48302/running-bzimage-in-qemu-unable-to-mount-root-fs-on-unknown-block0-0. ⤴
[7] “Kernel README”. URL: https://git.kernel.org/pub/scm/linux/kernel/git/stable/linux-stable.git/tree/README?id=refs/tags/v4.3.3. ⤴
[8] Thorsten Leemhuis. “Good and quick kernel configuration creation”. (2012) URL: http://www.h-online.com/open/features/Good-and-quick-kernel-configuration-creation-1403046.html. ⤴
[9] momersaleem. “How to speed up Linux kernel compilation?”. (2014) URL: https://stackoverflow.com/questions/23279178/how-to-speed-up-linux-kernel-compilation. ⤴
[10] “systemd-boot”. URL: https://wiki.archlinux.org/index.php/systemd-boot#Adding_boot_entries. ⤴
[11] “CPIO”. URL: https://www.gnu.org/software/cpio/manual/html_mono/cpio.html. ⤴
[12] “How do I build a Busybox-based system?”. URL: https://busybox.net/FAQ.html#build_system. ⤴
[13] Rodrigo Siqueira. “Use QEMU to Play with Linux Kernel”. (2019) URL: https://flusp.ime.usp.br/kernel/2019/02/15/use-qemu-to-play-with-linux/. ⤴
comments powered by Disqus