Use QEMU to Play with Linux Kernel
Written by Rodrigo Siqueira
Written on , last modified onThis tutorial provides a guide for setting up your QEMU VM. We first cover basic installation issues. We then explain how to use the basic features of QEMU. Finally, we show how to configure ssh and shared directory.
Command Summary
If you did not read this tutorial yet, skip this section. I added this section as a summary for someone that already read this tutorial and just wants to remember a specific command.
qemu-img create -f qcow2 [IMAGE-NAME] 10G

qemu-system-x86_64 -enable-kvm -cdrom ~/PATH/DISTRO_ISO.iso -boot order=d -drive \
                file=[NAME],format=qcow2 -m 2G

qemu-system-x86_64 -enable-kvm -nic user,hostfwd=tcp::2222-:22,smb=/PATH/TO/YOUR/SHARED/FOLDER \
                   -daemonize -m 4G -smp cores=4,cpus=4 [IMAGE-NAME]
Introduction
If you are curious about Linux Kernel development but feel afraid of accidentally breaking your system due to experiments, the solution for such problems can be summarized in one technology: Virtual Machine (VM). In this tutorial, we’ll learn how to use a powerful hardware virtualization tool named QEMU. I particularly appreciate QEMU because it’s a very popular tool (thus easy to find information about it on the Internet), it’s continuously updated, it features rich machine emulation, it’s free software, and it was initially designed for development.
QEMU is a generic machine emulator based on dynamic translation [3] that can operate in two different modes [2]:
- Full system emulation: A mode that completely emulates a computer. It can be used to launch different Operating Systems (OS);
- User mode emulation: Enables launching a process for one sort of CPU on another CPU.
If you have an x86 machine, you can use QEMU with KVM and achieve high
performance.
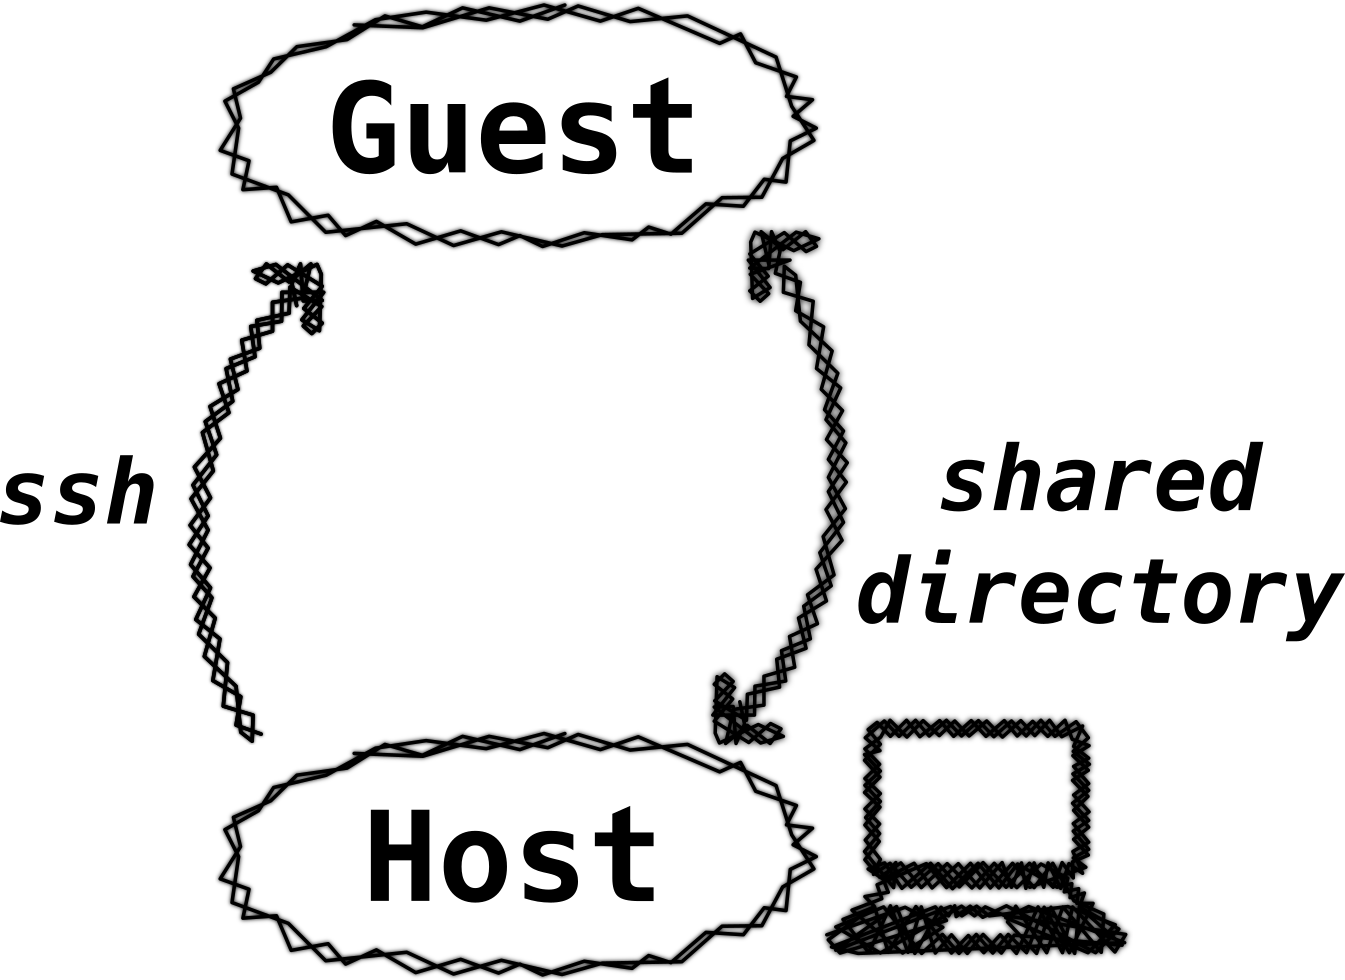
Keep in mind that we should avoid working inside the VM as it is a waste of computational resource. We want to work as much as possible inside the host and use the VM only for testing; because of this and for making our work environment comfortable, we need:
- SSH access;
- to share a directory between host and guest.
Finally, take a careful look at Figure 1 in order to get an overview of the adopted workflow for this tutorial.
Info: If you find any problem with this tutorial, please let me know. I will be glad to fix it.
Note
In this tutorial we will work inside and outside of a VM, for simplicity sake, we will add the following comment on top of each command:
@VM: Execute the command inside the VM.@HOST: Execute the command in your machine.
Prerequisites: Installing QEMU, KVM and OpenSSH
To follow this tutorial, you need to install QEMU and the Samba Client (samba is required for sharing directories between your host and guest).
→ On Arch Linux [1]:
# @HOST
sudo pacman -S qemu qemu-arch-extra samba openssh
→ On Debian [2]:
# @HOST
sudo apt install qemu samba samba-client openssh
Creating an Image
We want QEMU running a Linux distribution for our future experiments with Linux. With this goal in mind, we have to create an image disk with the following command:
# @HOST
qemu-img create -f qcow2 [IMAGE-NAME] 15G
Attention: Don’t blindly copy and paste the command above or any other found in this tutorial, try to understand it, by reading the brief description below the command and examining the documentation.
qemu-img: It’s the disk image utility provided by QEMU;create: Indicates that we want to create new disk image, you can add options to enable or disable features;-f qcow2: Specifies the image format; usually, you want ‘raw’ or ‘qcow2’. Raw images are fast, but it uses all the determined size at once; on the other hand, qcow2 is a little bit slower, but it increases the image size based on VM usage with the limit being the size given at creation;[IMAGE-NAME]: This command will end up with an image file, and here is the name that we assign; feel free to assign whatever name you want to it;15G: The image size.
In this tutorial, I recommend using qcow2 with 10 or 15 GB.
Note that if you’re using a partition scheme such as btrfs it’s a good idea to
disable the COW feature [8] as it becomes a heavy burden on your system, and for that
you have two options:
-
disabling it on a per folder basis (disable it for all your QEMU images once and for all):
# @HOST chattr +C -R path/to/your/images/folder -
disabling it on a per image basis:
You should add the
-o nocow=onflag when creating the image, i.e.# @HOST qemu-img create -f qcow2 -o nocow=on [IMAGE-NAME] 15G
Finally, check if everything is fine with the command:
# @HOST
file [IMAGE-NAME]
The output of the command above, should be something similar to [IMAGE-NAME]: QEMU QCOW Image (v3), 16106127360 bytes
Installing a Distro
Next, download any Linux distribution image you want to use (I recommend Debian or Arch Linux [6] [7], but it can be any). With your QEMU image file created above and your distro’s ISO, follow the command below:
# @HOST
qemu-system-x86_64 -enable-kvm -cdrom ~/PATH/TO/YOUR_DISTRO_ISO.iso -boot order=d -drive file=[IMAGE-NAME] -m 2G
The command above can be explained briefly as:
qemu-system-x86_64: We want to spin up an emulated 64bit system under the x86 instruction set-enable-kvm: Enable full virtualization by using KVM [5];-cdrom: This specifies what should go in our emulated cd slot;-boot order=d: Specifier we want to boot from CD-ROM first;-drive: This defines a new drive on the system (like your usual hard drive) so we can just specify our previously create image file by using-drive file=[NAME];-m: RAM size; usually we won’t need much for installing a system but your milleage may vary if you need to compile something (on a Gentoo guest for example).
In some distros the command above fails or show a warning due to the
-enable-kvm parameter. This may happen due to one of the following problems:
- You might not have KVM support on your machine; it’s quite likely you do in fact have it if your processor is new, but you might want to check it out [9];
- You might not have KVM enabled on your machine, which is usually done by passing kernel parameters on boot [10];
- Or maybe your host user isn’t part of the KVM group. You can fix it by adding
yourself to the KVM group. For example:
sudo usermod -a -G kvm $USER.
If you did try out any of the last two options you should also reboot your machine before trying to use kvm again.
The command above will start up a VM and mount the ISO file you’ve downloaded on it. After installation has finished, it’ll reboot the VM automatically.
Proceed with the installation, and come back here after you finish. For the sake of simplicity, create a user in the VM that match with your host machine user.
Booting up a QEMU VM
Finally, it is time to start the machine. Take a look at the command below and adapt it for your needs:
# @HOST
qemu-system-x86_64 -enable-kvm -nic user,hostfwd=tcp::2222-:22,smb=/PATH/TO/YOUR/SHARED/FOLDER -daemonize -m 2G -smp cores=4,cpus=4 [IMAGE-NAME]
qemu-system-x86_64: Command that start the QEMU VM.-nic: Shortcut to specify network options and hardware options altogether;user: Is used to specify user mode network settings (i.e. we shouldn’t need configuring network on the VM beyond some basics);hostfwd: We can setup a very basic port forwarding scheme so that the host can connect via ssh (look QEMU’s man pages for more details);smb: Here we can specify a folder to be shared using QEMU’s internal samba client (you shouldn’t need this if you have a proper samba setup already in place!);
-daemonize: Daemonize the QEMU process after initialization;-smp: Simulate a SMP system with n CPUs.
This command will pop up a window with the recently installed distribution from the step before. For detailed information about the options used in this command, take a look at the man page.
Configuring SSH
At this point, probably you can log in and out of the VM by typing the VM’s user’s password; this can be cumbersome during the work.
To make your work experience better, follow the steps below for creating a passwordless ssh connection, using an RSA key pair.
Info: There’re many ways for setting up an SSH connection; here’s a 1000 foot view of the process.
First, create an RSA key pair on the host machine (if there isn’t any already) with the command:
# @HOST
ssh-keygen -t rsa # Note: If you want to have a fully passwordless setup just enter blank in this step
Explaining the above command is beyond this tutorial. There’s plenty of
information about it on the Internet [4]. After
the key is set up, you need to prepare the recently created VM to accept ssh
connections. Just install the package openssh on it (Arch: openssh, Debian:
openssh-server).
Since you are working in a fresh install you will need to temporally enable password authentication in the VM in order to log in from the host machine. Follow the steps below:
- In the VM:
sudo sed -i 's/#\(PasswordAuthentication\).*/\1 yes/' /etc/ssh/sshd_config; - Restart the service:
sudo systemctl restart sshd.
Now, from the host machine test logging in into the VM with:
# @HOST
ssh -p 2222 127.0.0.1
Note that the above command will try to log into the VM using the default host’s username, which is $USER, so make sure it exists in that machine.
If everything works as expected, at this point, you can access the VM’s shell. Moving on, log out of the VM, and from the host machine type in the following:
# @HOST
ssh-copy-id -p 2222 $USER@127.0.0.1
Try to reaccess the VM, open the file /etc/ssh/sshd_config, comment the line
with PasswordAuthentication, restart the sshd service, and leave the VM.
Finally, try to ssh into the VM, and you will be able to access the machine
using your ssh key.
Sharing a Directory With your Local Machine
We are close to having a great development environment for playing with the Linux Kernel; we now have a final setup to do: share a directory between our VM and our host system. We want to share a directory because we only need to use our VM for testing and not for development, i.e. we can compile the kernel in our powerful host machine then install it in the VM. To accomplish this task, we use the sharing mechanism provided by samba.
First, we need to install the samba and CIFS packages in both our systems. Do:
→ ArchLinux
# @HOST
sudo pacman -S samba
→ Debian
# @HOST
sudo apt install samba cifs-utils
Second, start the VM and install the same packages.
# @HOST
qemu-system-x86_64 -enable-kvm -nic user,hostfwd=tcp::2222-:22,smb=/PATH/TO/YOUR/SHARED/FOLDER -daemonize -m 2G -smp cores=4,cpus=4 [IMAGE-NAME]

ssh -p 2222 127.0.0.1

# @VM
sudo pacman -S samba cifs-utils
# or
sudo apt install samba cifs-utils
Now, we want setup our VM so that the shared directory is accessible on-demand, i.e., the VM and host start to share a directory if the user tries to access the folder.
-
We have to update the
/etc/fstab. In the end offstabfile add the following line://10.0.2.4/qemu /PATH/TO/YOUR/SHARED/FOLDER cifs uid=1000,credentials=/root/.cifs,x-systemd.automount,noperm 0 0You have to use the correct
uidhere; you can use the commandid YOUR_USER. -
Additionally, create another file named
.cifsunder the/root/folder with the following content:username=YOUR_USER_NAME password=ANY_PASSWORD_YOU_WANT -
Now we create the shared directory:
# @VM mkdir shared -
Reboot your VM, start it using the command mentioned early, then access it via ssh, and try to access the
shareddirectory. If everything works well, you should see the directory and files that you shared with your host machine.
Conclusion
Keep in mind that we just scratched QEMU’s surface, this tool provides many features and have other tools for easily manage VMs. Finally, follow my feed for new tutorials about QEMU and Linux development.
Acknowledgments
I would like to thanks Charles Oliveira, Shayenne da Luz Moura, Rodrigo Ribeiro, Matheus Tavares, Melissa Wen, and Marcelo Schmitt for their reviews and contributions for this tutorial.
History
- V1: Release
- V2: Improve highlights
- V3: Add Melissa’s suggestions in some of the steps
- V4: Add Isabella’s improvements including QEMU command details
References
[1] “QEMU Arch Wiki”. URL: https://wiki.archlinux.org/index.php/QEMU. ⤴
[2] “QEMU Debian Wiki”. URL: https://wiki.debian.org/QEMU#Installation. ⤴
[3] “QEMU Official Website”. URL: https://www.qemu.org/. ⤴
[4] Etel Sverdlov. “How To Set Up SSH Keys”. URL: https://www.digitalocean.com/community/tutorials/how-to-set-up-ssh-keys–2. ⤴
[5] “Kernel-based Virtual Machine”. URL: https://en.wikipedia.org/wiki/Kernel-based_Virtual_Machine. ⤴
[6] “Installation guide”. URL: https://wiki.archlinux.org/index.php/installation_guide. ⤴
[7] “How to Install Arch Linux [Step by Step Guide]”. URL: https://itsfoss.com/install-arch-linux/. ⤴
[8] “Disk Images ─ QEMU documentation”. URL: https://qemu.readthedocs.io/en/latest/system/images.html#cmdoption-qcow2-arg-nocow. ⤴
[9] “KVM Arch Wiki”. URL: https://wiki.archlinux.org/title/KVM#Checking_support_for_KVM. ⤴
[10] “Kernel parameters Arch Wiki”. URL: https://wiki.archlinux.org/title/Kernel_parameters. ⤴
comments powered by Disqus