IIO Dummy module Experiment One: Play with iio_dummy
Written by Rodrigo Siqueira
Written on , last modified onWe already discussed the internal aspects of the IIO dummy driver; now it is
time to make some practical things. In this tutorial, we will use iio_dummy
and learn how the user space can communicate with sensors in the IIO subsystem.
Command summary
If you did not read this tutorial yet, skip this section. I added this section as a summary for someone that already read this tutorial and just want to remember a specific command.
→ Compile iio_dummy:
make M=drivers/iio/dummy
→ Install module:
sudo make modules_install
→ Load iio_dummy:
sudo modprobe iio_dummy
→ Get iio_dummy info:
modinfo iio_dummy
lsmod | grep iio_dummy
ls -l /sys/bus/iio/devices
ls -l /sys/bus/iio/devices/iio:device0/
→ About configfs in the iio_dummy:
sudo mkdir /mnt/iio_experiments/
sudo mount -t configfs none /mnt/iio_experiments/
ls /mnt/iio_experiments/
ls /mnt/iio_experiments/iio/devices/
sudo mkdir /mnt/iio_experiments/iio/devices/dummy/my_glorious_dummy_device
Note
In this tutorial we will work inside and outside of a VM, for simplicity sake, we will add the following comment on top of each command:
@VM: Execute the command inside the VM.@HOST: Execute the command in your machine.
Additionally, most of our work going to be conducted inside the kernel directory. Finally, let me know if you have any questions, comments or if you found any errors in this tutorial.
Introduction
In this post, we conduct a series of exploratory experiments using the IIO dummy. Following what we are going to do here:
- Enable the IIO dummy module via
nconfig; - Compile the IIO dummy module;
- Load and unload
iio_dummymodule; - Inspect the
/sys/bus/iio/*; - Modify
iio_simple_dummymodule to add channels for a 3-axis compass.
Before you read this post I recommend you to read “Use Qemu to play with Linux Kernel” and “Compile In-tree Driver”. In this post, I explain some details about compile, load, unload, and some troubleshooting.
Enabling iio_dummy
For compiling the iio_dummy, we need to enable it in the .config file via
nconfig menu. The picture below shows the steps:
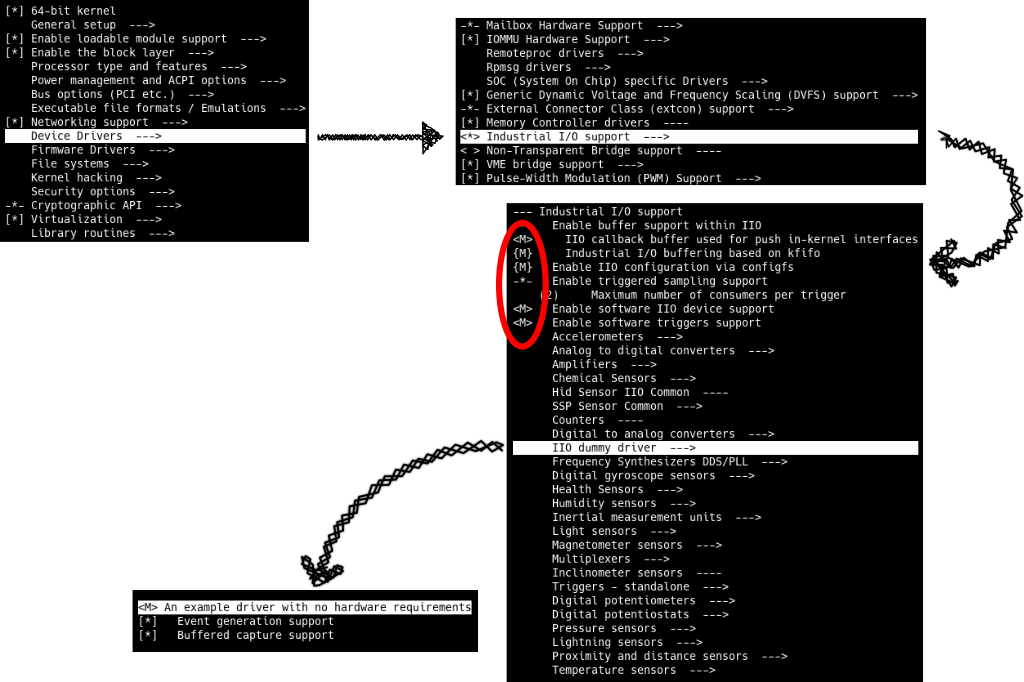
iio_dummy
After you enable the module, you can verify that the options are set correctly
by inspecting the .config file. You should see something similar to this:
[..]
#
# IIO dummy driver
#
CONFIG_IIO_DUMMY_EVGEN=m
CONFIG_IIO_SIMPLE_DUMMY=m
CONFIG_IIO_SIMPLE_DUMMY_EVENTS=y
CONFIG_IIO_SIMPLE_DUMMY_BUFFER=y
[..]
Compile, Load, and Unload iio_dummy
Here we’ll not explain the details about this operation because you can read a
detailed description in [1]. To compile,
load, and unload the iio_dummy module follow the steps below inside your
kernel git directory:
# @HOST
make M=drivers/iio/dummy

# @VM
sudo make modules_install
sudo modprobe iio_dummy
Again, if you want to know the details around the compilation/load/unload operation or have any problem in this step, take time to read the post “Play with Kernel Modules” [1].
If everything worked as expected, you could check the module information as following:
# @VM
modinfo iio_dummy

filename:       /lib/modules/4.16.0-rc3-TORVALDS+/kernel/drivers/iio/dummy/iio_dummy.ko.xz
license:        GPL v2
description:    IIO dummy driver
author:         Jonathan Cameron <jic23@kernel.org>
srcversion:     B2B5E23A9B1B98D882091B3
depends:        industrialio-sw-device,industrialio,iio_dummy_evgen,kfifo_buf
retpoline:      Y
name:           iio_dummy
vermagic:       4.16.0-rc3-TORVALDS+ SMP preempt mod_unload modversions
Next, to verify that the module has loaded correctly, you can use lsmod and
grep together. After executing the command below, you should see output
similar to:
# @VM
lsmod | grep iio_dummy

iio_dummy              16384  0
industrialio_sw_device    16384  1 iio_dummy
kfifo_buf              16384  1 iio_dummy
iio_dummy_evgen        16384  1 iio_dummy
industrialio           81920  3 iio_dummy,iio_dummy_evgen,kfifo_buf
Let’s take a look at the /sys/bus/iio/devices/ directory as a final
confirmation that everything is correct. Try the command below, and verify if
you have a similar output:
# @VM
ls -l /sys/bus/iio/devices

total 0
lrwxrwxrwx 1 root root 0 Mar  2 15:55 iio_evgen -> ../../../devices/iio_evgen

# @VM
ls -l /sys/bus/iio/devices/iio_evgen/

total 0
--w------- 1 root root 4096 Mar  2 15:56 poke_ev0
--w------- 1 root root 4096 Mar  2 15:56 poke_ev1
--w------- 1 root root 4096 Mar  2 15:56 poke_ev2
--w------- 1 root root 4096 Mar  2 15:56 poke_ev3
--w------- 1 root root 4096 Mar  2 15:56 poke_ev4
--w------- 1 root root 4096 Mar  2 15:56 poke_ev5
--w------- 1 root root 4096 Mar  2 15:56 poke_ev6
--w------- 1 root root 4096 Mar  2 15:56 poke_ev7
--w------- 1 root root 4096 Mar  2 15:56 poke_ev8
--w------- 1 root root 4096 Mar  2 15:56 poke_ev9
drwxr-xr-x 2 root root    0 Mar  2 15:56 power
lrwxrwxrwx 1 root root    0 Mar  2 15:56 subsystem -> ../../bus/iio
-rw-r--r-- 1 root root 4096 Mar  2 15:52 uevent
Finally, at this step, if you want to unload the module just try:
# @VM
sudo modprobe -r iio_dummy
Exploring iio_dummy
Before we start to make changes in the iio_dummy driver, let’s take some time to examine some basic features of the driver.
The configfs
The last step for creating your IIO dummy device is to mount a configfs
filesystem anywhere you want. I’d instead do it in the /mnt directory, as you
can see in the commands below:
# @VM
sudo mkdir /mnt/iio_experiments/
sudo mount -t configfs none /mnt/iio_experiments/
If you go through the /mnt/iio_experiments directory, you will observe
something like this:
# @VM
ls /mnt/iio_experiments/

iio  pci_ep

# @VM
ls /mnt/iio_experiments/iio/devices/

dummy
How about creating a new device? It is a simple task; we have to create a new directory inside the dummy:
# @VM
sudo mkdir /mnt/iio_experiments/iio/devices/dummy/my_glorious_dummy_device

# @VM
ls /mnt/iio_experiments/iio/devices/dummy/

my_glorious_dummy_device
Inspecting the /sys/bus/iio/devices Directory (again)
After the above steps, let’s look again at the /sys/bus/iio/devices/.
# @VM
ls -l /sys/bus/iio/devices/

total 0
lrwxrwxrwx 1 root root 0 Mar  2 16:07 iio:device0 -> ../../../devices/iio:device0
lrwxrwxrwx 1 root root 0 Mar  2 15:55 iio_evgen -> ../../../devices/iio_evgen
Did you notice the difference? Take a look at iio:device0 which is a new
element that appears in the tree. Try:
# @VM
ls -l /sys/bus/iio/devices/iio:device0/

total 0
drwxr-xr-x 2 root root    0 Mar  2 16:09 buffer
-rw-r--r-- 1 root root 4096 Mar  2 16:09 current_timestamp_clock
-r--r--r-- 1 root root 4096 Mar  2 16:09 dev
drwxr-xr-x 2 root root    0 Mar  2 16:09 events
-rw-r--r-- 1 root root 4096 Mar  2 16:09 in_accel_x_calibbias
-rw-r--r-- 1 root root 4096 Mar  2 16:09 in_accel_x_calibscale
-rw-r--r-- 1 root root 4096 Mar  2 16:09 in_accel_x_raw
-rw-r--r-- 1 root root 4096 Mar  2 16:09 in_activity_running_input
-rw-r--r-- 1 root root 4096 Mar  2 16:09 in_activity_walking_input
-rw-r--r-- 1 root root 4096 Mar  2 16:09 in_sampling_frequency
-rw-r--r-- 1 root root 4096 Mar  2 16:09 in_steps_calibheight
-rw-r--r-- 1 root root 4096 Mar  2 16:09 in_steps_en
-rw-r--r-- 1 root root 4096 Mar  2 16:09 in_steps_input
-rw-r--r-- 1 root root 4096 Mar  2 16:09 in_voltage0_offset
-rw-r--r-- 1 root root 4096 Mar  2 16:09 in_voltage0_raw
-rw-r--r-- 1 root root 4096 Mar  2 16:09 in_voltage0_scale
-rw-r--r-- 1 root root 4096 Mar  2 16:09 in_voltage1-voltage2_raw
-rw-r--r-- 1 root root 4096 Mar  2 16:09 in_voltage3-voltage4_raw
-rw-r--r-- 1 root root 4096 Mar  2 16:09 in_voltage-voltage_scale
-r--r--r-- 1 root root 4096 Mar  2 16:09 name
-rw-r--r-- 1 root root 4096 Mar  2 16:09 out_voltage0_raw
drwxr-xr-x 2 root root    0 Mar  2 16:09 power
drwxr-xr-x 2 root root    0 Mar  2 16:09 scan_elements
lrwxrwxrwx 1 root root    0 Mar  2 16:09 subsystem -> ../../bus/iio
drwxr-xr-x 2 root root    0 Mar  2 16:09 trigger
-rw-r--r-- 1 root root 4096 Mar  2 16:02 uevent
As you can see, there is many attributes and other stuff inside the
/sys/bus/iio/devices/iio:device0 directory. Notice that each attribute has
information, for example:
cat /sys/bus/iio/devices/iio:device0/name
my_glorious_dummy_device

cat /sys/bus/iio/devices/iio:device0/in_accel_x_raw
34

cat /sys/bus/iio/devices/iio:device0/in_voltage0_raw
73
Busy Device Issue
During my initial attempts to work with iio_dummy, I always get the following
message when I tried to unload the module:
sudo modprobe -r iio_dummy
modprobe: FATAL: Module iio_dummy is in use.
I tried many things to solve the problem. In one of my attempts, I used the
command rmmod -r iio_dummy, and I realized that I put my kernel in an unstable
state (I got oops [3] message during the
reboot). After some hours trying to figure out, I realized the problem was
related to the my_glorious_dummy_device directory previously created. The
solution is simple:
sudo rmdir /mnt/iio_experiments/iio/devices/dummy/my_glorious_dummy_device/
sudo modprobe -r iio_dummy
Adding Channels For a 3-axis Compass
We are going to modify the simple dummy to add a 3-axis compass channel. I will
not detail all the steps because I already dig into the iio_dummy module in
the “The iio_dummy Anatomy” [2] post. In
case you are a newcomer on the IIO subsystem, I strongly recommend you to read
the post about iio_dummy anatomy to better understand this section.
To add new channels, we have the following requirements:
- Users should be able to read raw data from each axis;
- Users should be able to read a shared scale;
- Users should be able to access data via a buffer:
- Data is unsigned; the resolution is 16 bits; storage is 16 bits.
- Compass doesn’t support events.
Update Simple Dummy Header
Ok, here we go. We want to add three new channels (one per axes); we start by
updating the file drivers/iio/dummy/iio_simple_dummy.h.
First of all, define a value for the 3 new channels as follows:
#ifndef _IIO_SIMPLE_DUMMY_H_
#define _IIO_SIMPLE_DUMMY_H_
#include <linux/kernel.h>

struct iio_dummy_accel_calibscale;
struct iio_dummy_regs;

#define DUMMY_AXIS_XYZ 3
Secondly, update the struct iio_dummy_state to keep the data for all three
axes. We added u16 buffer_compass[DUMMY_AXIS_XYZ] as the code below
illustrates:
struct iio_dummy_state {
	int dac_val;
	int single_ended_adc_val;
	int differential_adc_val[2];
	int accel_val;
	int accel_calibbias;
	int activity_running;
	int activity_walking;
	const struct iio_dummy_accel_calibscale *accel_calibscale;
	struct mutex lock;
	struct iio_dummy_regs *regs;
	int steps_enabled;
	int steps;
	int height;
	u16 buffer_compass[DUMMY_AXIS_XYZ];
#ifdef CONFIG_IIO_SIMPLE_DUMMY_EVENTS
	int event_irq;
	int event_val;
	bool event_en;
	s64 event_timestamp;
#endif /* CONFIG_IIO_SIMPLE_DUMMY_EVENTS */
};
Finally, we have to update iio_simple_dummy_scan_elements to add a new index
per channel. We append four new elements in the enum as the code shows:
enum iio_simple_dummy_scan_elements {
	DUMMY_INDEX_VOLTAGE_0,
	DUMMY_INDEX_DIFFVOLTAGE_1M2,
	DUMMY_INDEX_DIFFVOLTAGE_3M4,
	DUMMY_INDEX_ACCELX,
	DUMMY_INDEX_SOFT_TIMESTAMP,
	DUMMY_MAGN_X,
	DUMMY_MAGN_Y,
	DUMMY_MAGN_Z,
};
Notice that we also added DUMMY_INDEX_SOFT_TIMESTAMP, we did it for
comprehension sake as you will see in the next section. With these changes, we
finished with iio_simple_dummy.h.
Add Channels to iio_chan_spec
Now it is time to configure the channel to support one channel per axis. See:
{
	.type = IIO_MAGN,
	.modified = 1,
	.channel2 = IIO_MOD_X,
	.info_mask_separate = BIT(IIO_CHAN_INFO_RAW),
	.info_mask_shared_by_type = BIT(IIO_CHAN_INFO_SCALE),
	.scan_index = DUMMY_MAGN_X,
	.scan_type = {
		.sign = 'u',
		.realbits = 16,
		.storagebits = 16,
		.shift = 0,
	},
},
We will add the new channels at the end of the iio_chan_spec
iio_dummy_channels struct. We declared the channel type as IIO_MAGN, and
used .modified to configure .channel2 as IIO_MOD_X. Next, the field
.info_mask_shared_by_type made the scale shared for this channel, and we use
the same approach for all the other channels. Note that .scan_index gets
DUMMY_MAGN_X, and this value should be unique. Finally, the .scan_type
configured the buffer type as unsigned and with 16 bits for resolution and
storage.
The channels for the axis Y and Z are similar; they differ by the field
.channel2 and .scan_index.
Do you remember from the last section that I told to keep in mind the
DUMMY_INDEX_SOFT_TIMESTAMP? So, go to iio_chan_spec again and find for:
/*
 * Convenience macro for timestamps. 4 is the index in
 * the buffer.
 */
IIO_CHAN_SOFT_TIMESTAMP(4),
The first time that I tried to add a new channel I received an error indicating
that the index was already in use. After a long time trying to understand the
problem I finally realized the above line uses the scan_index 4, and I was
trying to use it. To make the code readable (from my perspective), I
decided to add this element in the iio_simple_dummy_scan_elements and finally
replaced the magic number 4 by DUMMY_INDEX_SOFT_TIMESTAMP.
Initialize Values
In the last section, we added new channels; now we have to initialize them.
A great place to do it is in the iio_dummy_init_device function:
static int iio_dummy_init_device(struct iio_dev *indio_dev)
{
	struct iio_dummy_state *st = iio_priv(indio_dev);

    ...
	st->buffer_compass[0] = 78;
	st->buffer_compass[1] = 10;
	st->buffer_compass[2] = 3;

	return 0;
}
Update *read_raw() for Handling the New Channel
To make the data provided by our new channel accessible in the user space, we
have to expand the iio_dummy_read_raw() function:
static int iio_dummy_read_raw(struct iio_dev *indio_dev,
			      struct iio_chan_spec const *chan,
			      int *val,
			      int *val2,
			      long mask)
{
	struct iio_dummy_state *st = iio_priv(indio_dev);
	int ret = -EINVAL;

	mutex_lock(&st->lock);
	switch (mask) {
	case IIO_CHAN_INFO_RAW: /* magic value - channel value read */
		case IIO_VOLTAGE:
            ...
			break;
		case IIO_ACCEL:
            ...
			break;
		case IIO_MAGN:
			switch(chan->scan_index) {
				case DUMMY_MAGN_X:
					*val = st->buffer_compass[0];
					break;
				case DUMMY_MAGN_Y:
					*val = st->buffer_compass[1];
					break;
				case DUMMY_MAGN_Z:
					*val = st->buffer_compass[2];
					break;
				default:
					*val = 99;
					break;
			}
			ret = IIO_VAL_INT;
			break;
		default:
			break;
		}
...
Notice that we added IIO_MAGN inside IIO_CHAN_INFO_RAW, and collected each
data provided by the struct iio_dummy_state. Now, we just have to add the
shared channel:
case IIO_CHAN_INFO_SCALE:
	switch (chan->type) {
	case IIO_VOLTAGE:
	    ...
		break;
	case IIO_MAGN:
		// Just add some dummy values
		*val = 0;
		*val2 = 2;
		ret = IIO_VAL_INT_PLUS_MICRO;
		break;
	default:
		break;
	}
Almost done, I just want to add one final touch. Go to the end of this file and change the description:
MODULE_DESCRIPTION("IIO dummy driver -> IIO dummy modified by Me");
Done! Compile and install the module again to test the new channels. You should see something similar to:
modinfo iio_dummy

filename:       /lib/modules/4.16.0-rc3-TORVALDS+/kernel/drivers/iio/dummy/iio_dummy.ko.xz
license:        GPL v2
description:    IIO dummy driver -> IIO dummy modified by Me
author:         Jonathan Cameron <jic23@kernel.org>
srcversion:     1C4C5F875A87E3DFD4F2820
depends:        industrialio-sw-device,industrialio,iio_dummy_evgen,kfifo_buf
retpoline:      Y
name:           iio_dummy
vermagic:       4.16.0-rc3-TORVALDS+ SMP preempt mod_unload modversions
Test the Changes
To finish this tutorial, let’s take another time to look at
/sys/bus/iio/devices/iio:device0/ again.
ls -l /sys/bus/iio/devices/iio:device0/

total 0
drwxr-xr-x 2 root root    0 Mar  2 16:27 buffer
-rw-r--r-- 1 root root 4096 Mar  2 16:27 current_timestamp_clock
-r--r--r-- 1 root root 4096 Mar  2 16:27 dev
drwxr-xr-x 2 root root    0 Mar  2 16:27 events
-rw-r--r-- 1 root root 4096 Mar  2 16:27 in_accel_x_calibbias
-rw-r--r-- 1 root root 4096 Mar  2 16:27 in_accel_x_calibscale
-rw-r--r-- 1 root root 4096 Mar  2 16:27 in_accel_x_raw
-rw-r--r-- 1 root root 4096 Mar  2 16:27 in_activity_running_input
-rw-r--r-- 1 root root 4096 Mar  2 16:27 in_activity_walking_input
-rw-r--r-- 1 root root 4096 Mar  2 16:27 in_magn_scale
-rw-r--r-- 1 root root 4096 Mar  2 16:27 in_magn_x_raw
-rw-r--r-- 1 root root 4096 Mar  2 16:27 in_magn_y_raw
-rw-r--r-- 1 root root 4096 Mar  2 16:27 in_magn_z_raw
-rw-r--r-- 1 root root 4096 Mar  2 16:27 in_sampling_frequency
-rw-r--r-- 1 root root 4096 Mar  2 16:27 in_steps_calibheight
-rw-r--r-- 1 root root 4096 Mar  2 16:27 in_steps_en
-rw-r--r-- 1 root root 4096 Mar  2 16:27 in_steps_input
-rw-r--r-- 1 root root 4096 Mar  2 16:27 in_voltage0_offset
-rw-r--r-- 1 root root 4096 Mar  2 16:27 in_voltage0_raw
-rw-r--r-- 1 root root 4096 Mar  2 16:27 in_voltage0_scale
-rw-r--r-- 1 root root 4096 Mar  2 16:27 in_voltage1-voltage2_raw
-rw-r--r-- 1 root root 4096 Mar  2 16:27 in_voltage3-voltage4_raw
-rw-r--r-- 1 root root 4096 Mar  2 16:27 in_voltage-voltage_scale
-r--r--r-- 1 root root 4096 Mar  2 16:27 name
-rw-r--r-- 1 root root 4096 Mar  2 16:27 out_voltage0_raw
drwxr-xr-x 2 root root    0 Mar  2 16:27 power
drwxr-xr-x 2 root root    0 Mar  2 16:27 scan_elements
lrwxrwxrwx 1 root root    0 Mar  2 16:28 subsystem -> ../../bus/iio
drwxr-xr-x 2 root root    0 Mar  2 16:27 trigger
-rw-r--r-- 1 root root 4096 Mar  2 16:27 uevent
Now, you can see four new attributes: in_magn_x_raw, in_magn_y_raw,
in_magn_z_raw, and in_magn_scale. Take a look at each one:
$ cat /sys/bus/iio/devices/iio:device0/in_magn_scale
0.000002

$ cat /sys/bus/iio/devices/iio:device0/in_magn_x_raw
78

$ cat /sys/bus/iio/devices/iio:device0/in_magn_y_raw
10

$ cat /sys/bus/iio/devices/iio:device0/in_magn_z_raw
3
Conclusion
In this tutorial, I tried to provide the reader with the essential principles to start with the IIO subsystem. Keep in mind, that you can use a similar approach for handling real drivers.
Acknowledgments
I would like to thanks Melissa Wen for her detailed review. I really appreciate you taking the time out to share your feedback.
History
- V1: Release
References
[1] Rodrigo Siqueira. “Play with Kernel Modules”. URL: https://flusp.ime.usp.br/kernel/2019/04/07/play_with_modules/. ⤴
[2] Rodrigo Siqueira. “The iio_simple_dummy Anatomy”. URL: https://flusp.ime.usp.br/iio/2019/03/16/iio-dummy-anatomy/. ⤴
[3] “Linux kernel oops”. URL: https://en.wikipedia.org/wiki/Linux_kernel_oops. ⤴
comments powered by Disqus