Setting up a test environment for Linux Kernel Dev using QEMU and libvirt
Written by Marcelo Schmitt
Written on , last modified onThis tutorial describes setting up a Linux kernel development test environment
using QEMU and libvirt to safely and efficiently compile and install custom
kernels from source code. It is the first of a series of 4 tutorials introducing
newcomers to Linux kernel development using the Industrial I/O (IIO) subsystem
as a practical workspace for hands-on learning.
Command Summary
Skip this section if you have not completed this tutorial yet. This is a reference for those who have gone through this tutorial and want to remember specific commands.
### CREATE TEST ENV DIR AND SET PERMISSIONS
sudo mkdir /home/lk_dev # creates directory `lk_dev` inside `/home`
sudo chown -R libvirt-qemu:libvirt-qemu /home/lk_dev # change ownership of `/home/lk_dev` to `libvirt-qemu` user and group
sudo chmod -R 2770 /home/lk_dev # modify permissions of `/home/lk_dev` and make new sub-files/dirs inherit group
sudo usermod -aG libvirt-qemu "$USER" # add your user to the `libvirt-qemu` group

### MANIPULATE DISK IMAGES
qemu-img info "${VM_DIR}/base_arm64_img.qcow2" # shows infos about the disk image
virt-filesystems --long --human-readable --all --add "${VM_DIR}/base_arm64_img.qcow2" # shows info about partitions and filesystems
qemu-img create -f qcow2 -o preallocation=metadata "${VM_DIR}/arm64_img.qcow2" 5G # creates new QCOW2 image with 5GB
virt-resize --expand /dev/<rootfs> "${VM_DIR}/base_arm64_img.qcow2" "${VM_DIR}/arm64_img.qcow2" # makes a copy of the image expanding the `rootfs`
virt-ls --add "${VM_DIR}/arm64_img.qcow2" --mount /dev/<rootfs> /boot # lists the files in `/boot` of partition `rootfs`
virt-copy-out --add "${VM_DIR}/arm64_img.qcow2" /boot/<kernel> "$BOOT_DIR"
virt-copy-out --add "${VM_DIR}/arm64_img.qcow2" /boot/<initrd> "$BOOT_DIR"

### MANAGE VMS
sudo systemctl start libvirtd # starts the libvirt daemon
sudo virsh net-start default # starts `virsh` default network
sudo virsh list --all # list all registered VMs
sudo virsh start --console arm64 # start a registered instance attaching console
sudo virsh console arm64 # attach console to running instance
sudo virsh shutdown arm64 # gracefully shutdown instance
sudo virsh net-dhcp-leases default # list `default` network
ssh root@<VM-IP-address> # SSH into VM of given IP
Introduction
This section is vital to understanding the motivation behind why we need a testing environment in the first place and how this environment will be, so don’t skip it!
When developing any software, it is essential to have a testing environment where you can execute the program you are developing to test the changes you make in the codebase. The testing environment should be safe and efficient. Safe means isolated from the development system - the system you use to develop the software - to avoid (1) adding setup biases (the “works on my machine” syndrome) and (2) messing up the development system (like creating files inside the home directory). Efficient means the testing environment should be quick and straightforward to set up (start) and teardown (stop), and provide fast feedback on changes, as there will be many cycles of making and then testing modifications. In Linux kernel development, this is truer than ever.
Most computers (certainly the ones you use to develop software) have an operating system (OS), and the kernel is its core component. So, when modifying the Linux kernel, you can use the OS the development system is running (if it is compatible with the Linux kernel) or use an OS in another system other than the development one. Using the OS of the development system isn’t safe or efficient, as a minor mistake can break the system, and you would need to reboot the system every time you want to test your change (there are workarounds, but in those cases, you are actually making robust testing environments). On the other hand, buying and configuring a new physical machine seems overkill and expensive, even more so when you are just curious about Linux development. This is where virtualization comes to save us!
Virtual machines (VMs) will be the testing environments for this series of tutorials. Although some may be tempted to use containers, it wouldn’t work, as it would essentially be the same as using the development system’s OS, as containers share the underlying kernel.
We will use QEMU to run VMs, in other words, to provide a virtual model of an
entire machine (CPU, memory, and emulated devices) that runs on top of the
actual machine’s OS, like an application. libvirt simplifies management of VMs
and allows automation. Together, they offer a safe and efficient way to test
kernel modifications without risking the stability of the development system.
Installing Tutorial Dependencies
Correctly installing the dependencies is vital to avoid problems during this tutorial, so install the following packages according to your Linux distribution. Note that these packages are “bloated”, in the sense that some of the commands we will use could be installed with a number of specific packages. Also, even if your distro fits the instructions below, the packages could have different names and/or be arranged differently.
# Arch-based distros
sudo pacman -Syy && sudo pacman -S qemu-full libvirt virt-install guestfs-tools wget
# Debian-based distros
sudo apt update && sudo apt install qemu-system libvirt-daemon-system virtinst libguestfs-tools wget
# Fedora-based distros
sudo dnf update && sudo dnf install qemu libvirt-daemon virt-install guestfs-tools wget
Setting Up the Testing Environment
In this series, host refers to the physical machine, while guest refers to the VM.
Summary of this tutorial:
- Preparing testing environment directory and “all-in-one” script
- Set up and configure a VM running a guest OS
- Configure SSH access from the host to the VM
- Fetch the list of modules loaded in the guest kernel
- Set up host <-> VM file sharing (optional)
1) Preparing testing environment directory and “all-in-one” script
A testing environment for Linux kernel development requires a handful of files.
Create a directory for this series of tutorials to keep things barely organized.
For reasons that will be explained in the future, we need to create a directory
that is owned by a group shared by our regular user and the user libvirt-qemu.
We can create a new dedicated group, but let’s leverage the already existing
libvirt-qemu group. The below command sequence may be the most “scary” one, so
don’t worry if you feel overwhelmed. This is a workaround to avoid delving into
too much of the technicalities of UNIX groups and file permissions in this
series. Note that you will need superuser privileges to run this sequence.
sudo mkdir /home/lk_dev # creates directory `lk_dev` inside `/home`
sudo chown -R libvirt-qemu:libvirt-qemu /home/lk_dev # change ownership of `/home/lk_dev` to `libvirt-qemu` user and group
sudo chmod -R 2770 /home/lk_dev # modify permissions of `/home/lk_dev` and make new sub-files/dirs inherit group
sudo usermod -aG libvirt-qemu "$USER" # add your user to the `libvirt-qemu` group
Whenever you see commands or code to be executed, don’t just copy and paste it blindly! Don’t worry if you don’t completely understand what they mean, but read them carefully. Otherwise, you won’t absorb the lessons from the tutorials.
For the changes to take effect, you will need to logout and login again!
Even though QEMU and libvirt heavily facilitate our work, we will need to
run many extensive and complex commands and have some environment variables set.
In fact, Linux developers are accustomed to creating Bash scripts to automate
tasks that would otherwise be boring, repeatable, and prone to error.
For this purpose, we will build a single script during these tutorials to house
everything we need. It will create a Bash shell session with the required
environment variables set and some utilities defined. Create a file called
activate.sh inside the lk_dev directory you’ve created before and make it
executable
touch '/home/lk_dev/activate.sh' # creates a file `activate.sh` inside `lk_dev`
chmod +x '/home/lk_dev/activate.sh' # make the file `activate.sh` executable
With your editor of choice, fill the file with the content below. Make sure to assign the path
you’ve used to create lk_dev/ to LK_DEV_DIR.
#!/usr/bin/env bash

# environment variables
export LK_DEV_DIR='/home/lk_dev' # path to testing environment directory

# prompt preamble
prompt_preamble='(LK-DEV)'

# colors
GREEN="\e[32m"
PINK="\e[35m"
BOLD="\e[1m"
RESET="\e[0m"

# launch Bash shell session w/ env vars defined
echo -e "${GREEN}Entering shell session for Linux Kernel Dev${RESET}"
echo -e "${GREEN}To exit, type 'exit' or press Ctrl+D.${RESET}"
exec bash --rcfile <(echo "source ~/.bashrc; PS1=\"\[${BOLD}\]\[${PINK}\]${prompt_preamble}\[${RESET}\] \$PS1\"")
Running
/home/lk_dev/activate.sh # runs `activate.sh` script
will start a Bash shell session with the variable LK_DEV_DIR defined (try
running echo "$LK_DEV_DIR") and a pink and bold (LK-DEV) preamble to your prompt. This
preamble is a visual tip to indicate that you are with the correct variables set
and utilities defined (there are none at the moment). To exit, you can type
exit and hit ENTER or Ctrl+D. Everytime you make modifications to activate.sh
you will need to exit and run it again.
FROM NOW ON, DON’T FORGET TO ALWAYS HAVE THE SCRIPT “ACTIVE” WHEN RUNNING COMMANDS!!!
We recommend you keep an editor open with activate.sh (for updating it) and a
terminal where you will run the script and do the steps of this tutorial.
2) Set up and configure a VM running a guest OS
2.1) Get a pre-existent OS disk image for the virtual machine.
An OS disk image will be needed to test the kernels we will produce. You can create a virtual disk and do a fresh installation or download a disk image from the Internet. Many Linux distributions (distros) provide minimal disk images for download; here you can find minimal disk images for Debian, Ubuntu, Fedora, and Suse. Your author is familiar with Debian distributions, so the following steps will describe how to set up a testing VM with a Debian guest OS. You can enhance this tutorial by adapting the following instructions to your favorite distro.
Create a directory for the VM artifacts inside lk_dev/
mkdir "${LK_DEV_DIR}/vm"
add this path to the VM_DIR variable in activate.sh
--- a/activate.sh
+++ b/activate.sh
@@ -2,6 +2,7 @@

 # environment variables
 export LK_DEV_DIR='/home/lk_dev' # path to testing environment directory
+export VM_DIR="${LK_DEV_DIR}/vm" # path to VM directory

 # prompt preamble
 prompt_preamble='(LK-DEV)'
then exit and re-run activate.sh.
We will download a nocloud Debian image that doesn’t contain any specific
optimizations for cloud environments (Azure, AWS, etc.), which is our case. This
series will focus on the IIO subsystem, so the image will be built for the ARM
64-bit architecture. You can also adapt this tutorial to any pre-built distro
image, but double-check that they are for ARM64!
wget --directory-prefix="${VM_DIR}" http://cdimage.debian.org/cdimage/cloud/bookworm/daily/20250217-2026/debian-12-nocloud-arm64-daily-20250217-2026.qcow2
mv "${VM_DIR}/debian-12-nocloud-arm64-daily-20250217-2026.qcow2" "${VM_DIR}/base_arm64_img.qcow2" # rename file for legibility
2.2) Resize disk image rootfs.
The downloaded image is minimal, so it should have around 3GB. If you run
du -h "${VM_DIR}/base_arm64_img.qcow2" # command to check [d]isk [u]sage of files/directories
you will see that the actual space occupied by the image is around 400MB. Essentially, 3GB is the maximum size the virtual disk can potentially grow to. To check information related to the disk image, you can run
qemu-img info "${VM_DIR}/base_arm64_img.qcow2" # shows infos about the disk image
3GB is large enough to install some kernel modules (we’ll talk about them later)
but not enough to have more than one extra set of modules. To avoid a lack of
disk space when playing with Linux modules, let’s resize the disk image to make
it a little bigger. Specifically, we need to resize the rootfs partition of
the disk, also known as /, which is the main filesystem where the OS is
installed.
First, discover which partition of the disk is the rootfs (this command can
take a little bit to run)
virt-filesystems --long --human-readable --all --add "${VM_DIR}/base_arm64_img.qcow2" # shows info about partitions and filesystems
You will probably have an output like
$ virt-filesystems --long --human-readable --all --add "${VM_DIR}/base_arm64_img.qcow2"

Name        Type        VFS   Label  MBR  Size  Parent
/dev/sda1   filesystem  ext4  -      -    2.8G  -
/dev/sda15  filesystem  vfat  -      -    127M  -
/dev/sda1   partition   -     -      -    2.9G  /dev/sda
/dev/sda15  partition   -     -      -    127M  /dev/sda
/dev/sda    device      -     -      -    3.0G  -
The partition with a VFS of ext4 should be the rootfs, so in the above
output, /dev/sda1 is the one we are looking for. The other partition, with a
vfat filesystem, is called the EFI System
Partition.
Finally, to resize rootfs, create a new disk image and copy the base ARM64
image while expanding the partition you’ve discovered in the previous step.
qemu-img create -f qcow2 -o preallocation=metadata "${VM_DIR}/arm64_img.qcow2" 5G # creates new QCOW2 image with 5GB
### ADAPT THE COMMAND BELOW ###
virt-resize --expand /dev/<rootfs> "${VM_DIR}/base_arm64_img.qcow2" "${VM_DIR}/arm64_img.qcow2" # makes a copy of the image expanding the `rootfs`
2.3) Extract the kernel and initrd images from the guest OS.
We are interested in testing custom Linux kernels (kernels compilated from
modified source code), and we will do it by emulating machines with QEMU. Our
emulation software of choice allows us to specify the kernel image through the
-kernel flag. We must also pass an initial
ramdisk, known as initrd, with
the modules necessary to load the kernel. Both the kernel and the initrd can
be found as files in the rootfs.
For now, we will use the kernel image and initrd that come with the OS disk
image we got. Later, we will replace the distro kernel with the one we will
build.
Even though we said we “expanded” the rootfs of the disk image, in actuality,
we created a new image with a bigger maximum allocated space, copied the
partitions to it, and added the left space to the partition we identified as
the rootfs. As a result, virt-resize may have designated different labels to
rootfs, so we need to rerun the virt-filesystems command.
virt-filesystems --long --human-readable --all --add "${VM_DIR}/arm64_img.qcow2" # shows info about partitions and filesystems
Again, you need to identify which partition is the rootfs. In my case,
virt-resize made /dev/sda2 as the rootfs.
The kernel and initrd are usually found at /boot in the rootfs, which is
our case with Debian images (in some cases, there is a dedicate partition for
/boot). First, list the files present inside /boot
### ADAPT THE COMMAND BELOW ###
virt-ls --add "${VM_DIR}/arm64_img.qcow2" --mount /dev/<rootfs> /boot # lists the files in `/boot` of partition `rootfs`
and take note of the name of the files starting with initrd.img- (mine was
initrd.img-6.1.0-31-arm64) and vmlinuz- (mine was vmlinuz-6.1.0-31-arm64).
These files are, respectively, the initrd and kernel image to be extracted.
Let’s create a directory for our boot artifacts before copying them out to keep things organized
mkdir "${VM_DIR}/arm64_boot"
and add this path to the BOOT_DIR variable in activate.sh (don’t forget to
rerun the script).
--- a/activate.sh
+++ b/activate.sh
@@ -3,6 +3,7 @@
 # environment variables
 export LK_DEV_DIR='/home/lk_dev' # path to testing environment directory
 export VM_DIR="${LK_DEV_DIR}/vm" # path to VM directory
+export BOOT_DIR="${VM_DIR}/arm64_boot" # path to boot artifacts

 # prompt preamble
 prompt_preamble='(LK-DEV)'
Now, let’s copy these artifacts from the OS image to the $BOOT_DIR.
### ADAPT THE COMMAND BELOW ###
virt-copy-out --add "${VM_DIR}/arm64_img.qcow2" /boot/<kernel> "$BOOT_DIR"
### ADAPT THE COMMAND BELOW ###
virt-copy-out --add "${VM_DIR}/arm64_img.qcow2" /boot/<initrd> "$BOOT_DIR"
To test our initial setup and do a checkpoint, we will launch the VM using the
disk image with the expanded rootfs. However, we will use a kernel and an
initrd that are not the ones inside the image (even though they are the same,
at this moment) to boot the VM. Modify activate.sh using the diff below to add
a utility called launch_vm_qemu. Note that you must fill the -initrd and
-kernel options with the correct initrd and kernel names, respectively.
Also, the X value of root=/dev/vdaX in the -append option should be
compatible with the rootfs, i.e., sda1 -> root=/dev/vda1. You can also
tinker with the memory (value of the -m), processor topology (-smp option),
and much more (see man qemu-system-aarch64 for reference).
--- a/activate.sh
+++ b/activate.sh
@@ -5,6 +5,26 @@ export LK_DEV_DIR='/home/lk_dev' # path to testing environment directory
 export VM_DIR="${LK_DEV_DIR}/vm" # path to VM directory
 export BOOT_DIR="${VM_DIR}/arm64_boot" # path to boot artifacts

+# utility functions
+
+# Launches a VM with a custom kernel and `initrd`
+function launch_vm_qemu() {
+    # DON'T FORGET TO ADAPT THE `-kernel`, `initrd`, AND `-append` LINES!!!
+    qemu-system-aarch64 \
+        -M virt,gic-version=3 \
+        -m 2G -cpu cortex-a57 \
+        -smp 2 \
+        -netdev user,id=net0 -device virtio-net-device,netdev=net0 \
+        -initrd "${BOOT_DIR}/<initrd>" \
+        -kernel "${BOOT_DIR}/<kernel>" \
+        -append "loglevel=8 root=/dev/<vdaX> rootwait" \
+        -device virtio-blk-pci,drive=hd \
+        -drive if=none,file="${VM_DIR}/arm64_img.qcow2",format=qcow2,id=hd \
+        -nographic
+}
+
+# export functions so they persist in the new Bash shell session
+export -f launch_vm_qemu
+
 # prompt preamble
 prompt_preamble='(LK-DEV)'

@@ -14,7 +34,7 @@ PINK="\e[35m"
 BOLD="\e[1m"
 RESET="\e[0m"

-# launch Bash shell session w/ env vars defined
+# launch Bash shell session w/ env vars and utility functions defined
 echo -e "${GREEN}Entering shell session for Linux Kernel Dev${RESET}"
 echo -e "${GREEN}To exit, type 'exit' or press Ctrl+D.${RESET}"
 exec bash --rcfile <(echo "source ~/.bashrc; PS1=\"\[${BOLD}\]\[${PINK}\]${prompt_preamble}\[${RESET}\] \$PS1\"")
Exit, rerun activate.sh, and run
launch_vm_qemu
to see the VM booting. The default login user is root with no password (empty
password). If everything goes smoothly, you should see your terminal window, as
shown in the Figure 1 below. See the Troubleshooting section for help if the
VM doesn’t boot.
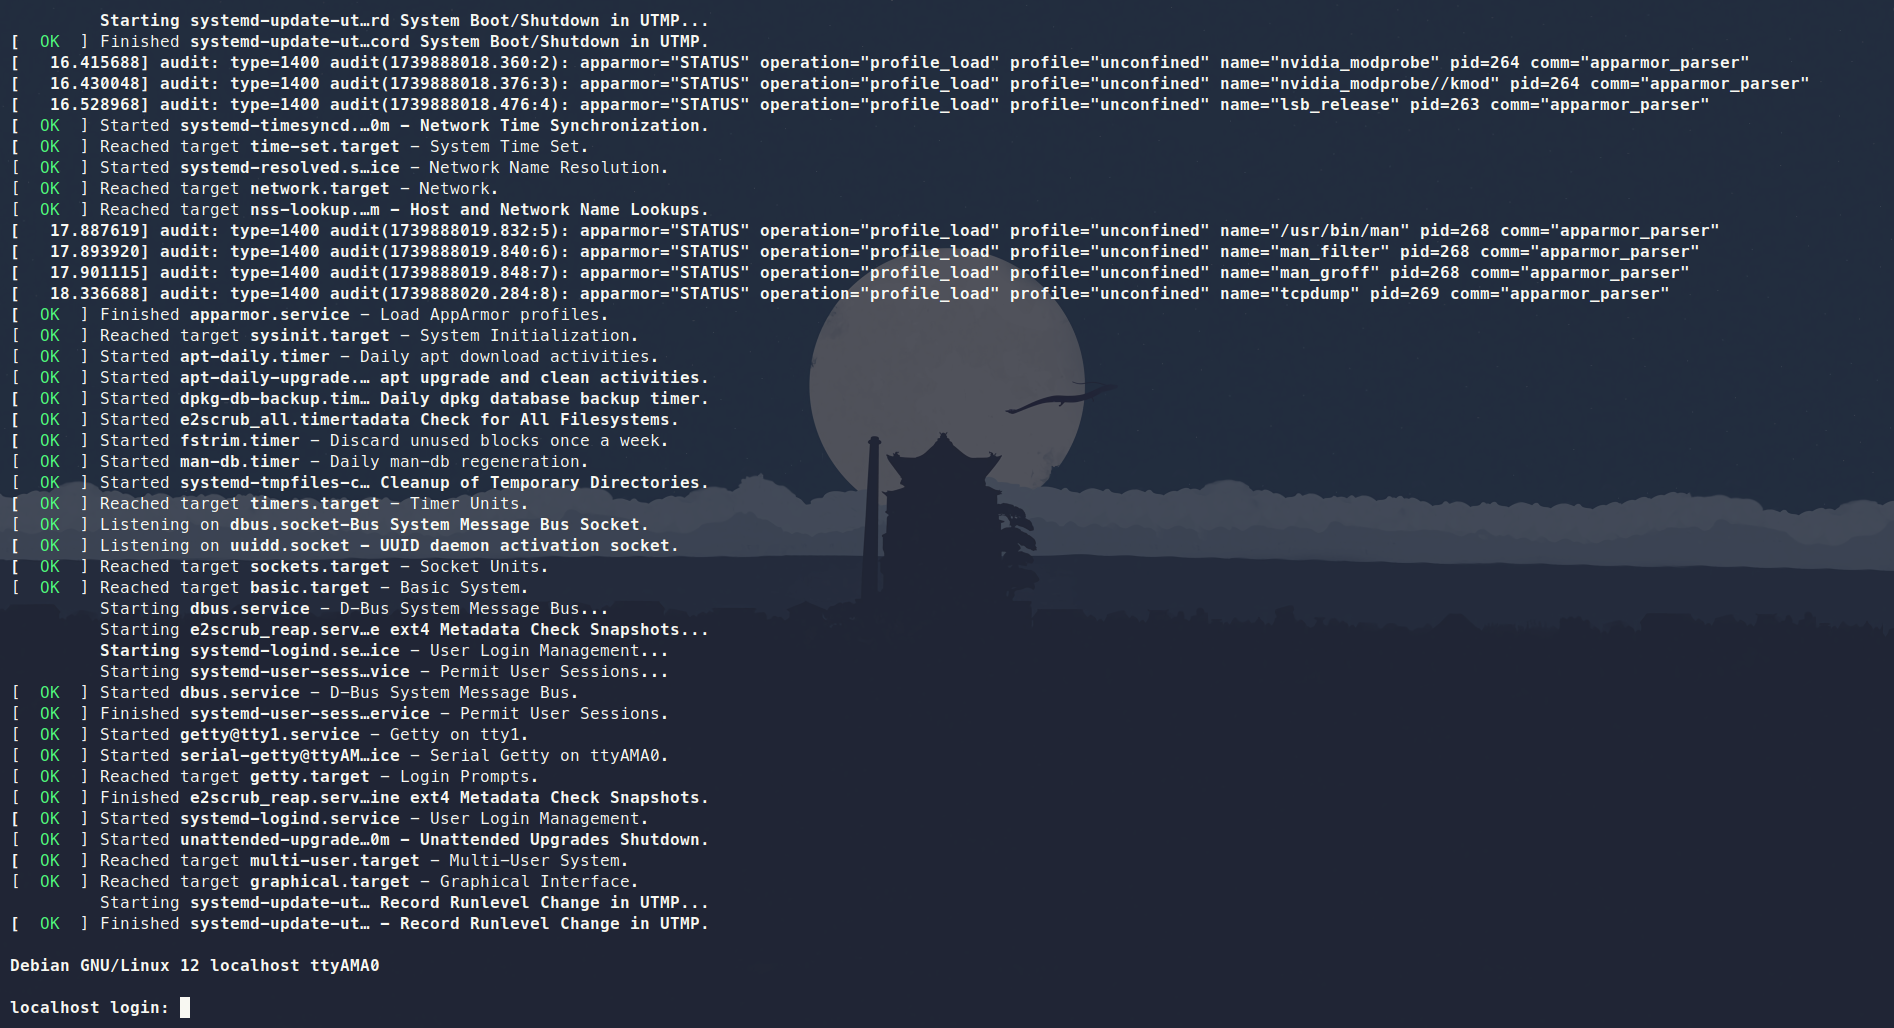
initrd using QEMU
After login, the command to shutdown the VM depends on the distro: it could be
shutdown --halt now or poweroff (the case if you’ve followed this tutorial
choice). If, for some reason, your VM is stuck, and you can’t normally shut it
down, you can kill the process by opening a new terminal and running, say,
pkill, as in pkill qemu.
2.4) Use libvirt to streamline managing VMs
Although we’ve already run a handful of virt- commands, they are utilities
from the libguestfs-tools or the guestfs-tools package. libvirt is a VM
manager that we will use to simplify managing the VMs and enable a virtual
network to which we can communicate with the VMs.
The libvirt daemon is necessary for the virsh commands we will run next.
Thus we need to start it.
sudo systemctl start libvirtd # starts the libvirt daemon
systemctl status libvirtd # shows the status of the daemon
Remind to start libvirtd every time you reboot your machine or enable the
service (sudo systemctl enable libvirtd) to start automatically at system
initialization.
virsh will be the tool for managing the VMs with libvirt. Some installations
may or may not allow non-root users to run virsh by default. If you happen to
be using such a system, know that it is possible to enable non-root users to run
virsh by setting libvirt default URI (export
LIBVIRT_DEFAULT_URI=qemu:///system) and adding --connect qemu:///system to
each virsh command.
Another option is to prepend sudo to run virsh commands with root
privileges. If you can run virsh without sudo, do it for all virsh commands.
For this tutorial, we will show virsh commands prepended with sudo since
it’s not hard to forget the URI export and have some operations run with and
without the correct permissions. You may see a set of VMs with virsh list
--all and another set by running sudo virsh list --all, for example. However,
using sudo requires that the complete path to the artifacts be readable and
writable by libvirt-qemu, and here is the reason behind doing all that group
and permissions management at the beginning of the tutorial: avoid messing with
the permissions of $HOME and the user primary group.
With all that being said, start an internal virtual network managed by
libvirt.
sudo virsh net-start default # starts `virsh` default network
Similarly to the libvirt daemon, the virsh default network will not start
automatically after reboot unless you configure it with sudo virsh
net-autostart default. You can certify if the default network has started with
sudo virsh net-list
which should output something like
 Name      State    Autostart   Persistent
--------------------------------------------
 default   active   no          yes
Once again, let’s update our activate.sh “all-in-one” script. Pay close
attention to the line with the --boot option. You must adapt it with the
correct values for kernel, initrd, and kernel_args (root=/dev/vdaX).
--- a/activate.sh
+++ b/activate.sh
@@ -22,8 +22,24 @@ function launch_vm_qemu() {
         -nographic
 }

+# Registers and starts a VM with `libvirt`
+function create_vm_virsh() {
+    # DON'T FORGET TO ADAPT THE `--boot` LINE!!!
+    sudo virt-install \
+      --name "arm64" \
+      --memory 2048 \
+      --arch aarch64 --machine virt \
+      --osinfo detect=on,require=off \
+      --import \
+      --features acpi=off \
+      --disk path="${VM_DIR}/arm64_img.qcow2" \
+      --boot kernel=${BOOT_DIR}/<kernel>,initrd=${BOOT_DIR}/<initrd>,kernel_args="loglevel=8 root=/dev/<vdaX> rootwait" \
+      --network bridge:virbr0 \
+      --graphics none
+}
+
 # export functions so they persist in the new Bash shell session
 export -f launch_vm_qemu
+export -f create_vm_virsh

 # prompt preamble
 prompt_preamble='(LK-DEV)'
Exit, rerun activate.sh, and run
create_vm_virsh
to see the VM named arm64 being created and your terminal attaching to the VM
console. If everything goes smoothly, you should see a terminal window like the
one in Figure 1 again.
Now, you can detach from this running VM (without shutting it down) by hitting
Ctrl+]. After that, you will return to the “activated” Bash shell session and
can check the VM status with
sudo virsh list --all
To re-attach to the console of the running VM, do
sudo virsh console arm64
2.5) Other useful virsh commands
- List all created VMs:
sudo virsh list --all - Show detailed information about a VM:
sudo virsh dominfo arm64 - Start a previously created VM with the terminal window attached to the console:
sudo virsh start --console arm64 - Shutdown a VM gracefully:
sudo virsh shutdown arm64 - Force shutdown a VM:
sudo virsh destroy arm64 - Remove a stopped VM:
sudo virsh undefine arm64
3) Configure SSH access from the host to the VM
In this section, pay close attention to the top of the command boxes. @host
and @VM indicate that the commands should be run in the host and in the VM,
respectively.
After successfully setting up a VM through plain QEMU and with enhancements
provided by libvirt, we are going to configure
SSH access from the host to the
VM so we can transfer files more easily.
Inside the VM, edit (vim will probably be available as an editor) the file
/etc/ssh/sshd_config (configuration file for the SSH server) to allow login
as the root user. Find the line starting with PermitRootLogin, uncoment it (if
necessary), add yes, then do the same for PermitEmptyPasswords, like in the
below box. If there are no lines like these, add them.
@VM
PermitRootLogin yes
...
PermitEmptyPasswords yes
Inside of the VM, configure the SSH daemon (sshd) keys and restart the SSH
server. If asked about “what to do about the modified configuration file
sshd_config” select the default option “keep the local version currently
installed”.
@VM
dpkg-reconfigure openssh-server # reconfigure `sshd` keys
systemctl restart sshd # restart service to consolidate changes
systemctl status sshd # check status of service
After that, reboot the VM with reboot. If this command is not available,
poweroff the VM with either the poweroff command from inside the VM or with
sudo virsh shutdown arm64, then start it again. If the poweroff does not
succeed, try to use sudo virsh destroy arm64.
After rebooting, find the VM IP address and take note of it by running the command below in the host.
@host
sudo virsh net-dhcp-leases default
And then we can SSH using the VM IP address by simply running
@host
ssh root@<VM-IP-address>
You can transfer files between the host and the VM using the scp tool
@host
scp root@<VM-IP-address>:/root/foo /tmp/bar # copies file `/root/foo` from inside the VM to `/tmp/bar` on the host
scp /tmp/bar root@<VM-IP-address>:/root/foo # copies file `/tmp/bar` from the host to `/root/foo` inside the VM
To simplify the SSH configuration, as it isn’t the focus of this tutorial, we
didn’t set public-key authentication or other security measures. See this
cyberciti.biz
post
for a reference to a more robust SSH setup example.
4) Fetch the list of modules loaded in the guest kernel
Logged in the virtual machine, run lsmod to list the currently loaded kernel
modules and save that list into a file.
@host
ssh root@<VM-IP-address>
@VM
lsmod > vm_mod_list
The list of loaded kernel modules will later help reduce Linux build time in part 2 of this workshop.
5) Set up host <-> VM file sharing (optional)
To transfer code and files between guest and host device, one can use
the scp command. Even better, tools for kernel development, such as
kworkflow, provide commands that will make the process simpler and
safer. This is the approach we recommend and will adopt on future tutorials.
However, you may still want to enable shared directories depending on your current workflow or personal choice.
To create a libvirt shared directory, we will edit the VM description.
sudo EDITOR=vim; sudo virsh edit iio-arm64
Add the memoryBacking node within the domain node and add the filesystem
node within the devices node.
<domain>
  ...
  <memoryBacking>
    <source type='memfd'/>
    <access mode='shared'/>
  </memoryBacking>
  ...
  <devices>
    ...
    <filesystem type='mount' accessmode='passthrough'>
      <driver type='virtiofs' />
      <source dir='/path'/>
      <target dir='mount_tag'/>
    </filesystem>
    ...
  </devices>
</domain>
The /path in <source dir='/path'/> stands for the location (path)
in the host machine that will be shared with the guest (virtual) machine.
For instance, one can do
@host
cd "$LK_DEV_DIR"
mkdir shared_arm64
then use that directory for the sharing on the host side
<source dir='/LK_DEV_DIR_FULL_PATH/shared_arm64'/>.
Inside the VM, mount the shared directory.
@VM
mount -t virtiofs mount_tag /mnt/mount/shared
Now, the contents shared between the host and the VM will be available under
${LK_DEV_DIR}/mountpoint_arm64/ on the host and under /mnt/mount/shared/ on
the virtual machine side.
See the libvirt documentation for
reference on sharing files with virtiofs.
Troubleshooting
Virtual machines doesn’t boot
The VM might fail to boot if the boot and rootfs partitions are not correctly specified in QEMU or libvirt scripts.
Compare the output of
virt-filesystems --long -h --all -a base_iio_arm64.qcow2
with the output from
virt-filesystems --long -h --all -a iio_arm64.qcow2
In the original VM disk, the boot filesystem should be sda15 and the root
filesystem should be sda1. virt-resize might change the filesystem naming to
sda1 for boot and sda2 for rootfs or maybe to something else.
Check the output of virt-filesystems to figure out the correct partition names.
My VM is unable to connect to the internet
Configuring the network for libvirt VMs is not trivial and there are many
possible issues that could cause the problem.
If you are developing on a host device with an Arch-based distribution, however, there is
a chance that your libvirt network contains an incorrect firewall configuration. On the
host device, open /etc/libvirt/network.conf with your favorite text editor and
set firewall_backend=iptables.
Unable to connect through ssh
Beware the messages highligted by journalctl -xeu ssh.service
may be misleading when troubleshooting sshd startup.
A common error/warning message seen in journalctl logs is
ssh.service: Start request repeated too quickly.
If you go for that message, you may find a popular Stack Overflow thread suggesting to edit the virtual machine /etc/systemd/system/multi-user.target.wants/ssh.service file to set a higher start interval limit to the server.
However, that doesn’t solve the particular quick service restart
problem we often encounter with this setup. By reading through earlier journal
logs, if you find the message
sshd: no hostkeys available – exiting
try (re)generate OpenSSH host keys either with ssh-keygen -A
or with dpkg-reconfigure openssh-server.
See
How To: Ubuntu / Debian Linux Regenerate OpenSSH Host Keys
for additional explanation.
Cannot share directories between host and VM
The shared directory implementation for this setup is provided by virtiofs which requires Linux 5.4 or later with CONFIG_VIRTIO_FS and other configs enabled. You may see an error stating Unable to find a satisfying virtiofsd if the shared directory setup fail. See Standalone virtiofs usage for details on proper virtiofs setup.
Conclusion
This tutorial described setting up a virtual machine with QEMU and libvirt.
The virtual machine will be essential for testing changes to the Linux kernel.
By this point, you should be able to start the virtual machine either purely
with QEMU or with the help of libvirt. You should also be able to access the
VM using an SSH connection.
History
- V1: Release
- V2: Review for the Free Software Development course offered in 2025-1 at IME-USP
- V3: Add better explanations and troubleshoot of
libvirt+ Arch by Marcelo Spessoto, and addition of Fedora-based dependencies by David Tadokoro
comments powered by Disqus