Introduction to Linux kernel build configuration and modules
Written by Marcelo Schmitt
Written on , last modified onThis tutorial shows how to make a simple Linux kernel module and how to create build configurations for new kernel features.
This tutorial was originally thought to be part of a set of tutorials tailored to aid newcomers to develop for the Linux kernel Industrial I/O subsystem. This is a continuation for the “Building and booting a custom Linux kernel for ARM” and “Building and booting a custom Linux kernel for ARM using kw” tutorial.
Command Summary
If you did not read this tutorial yet, skip this section. This section was added as a summary for those that already went through this tutorial and just want to remember a specific command.
### MAKE COMMANDS TO CONFIGURE, COMPILE, AND INSTALL MODULES
make -C "$IIO_TREE" menuconfig # manage `.config` w/ a TUI
make -C "$IIO_TREE" -j$(nproc) Image.gz modules # compile kernel image and modules
make -C "$IIO_TREE" modules_install # install modules
make -C "$IIO_TREE" modules_prepare # refresh modules for compilation
make -C "$IIO_TREE" M=<path-of-dir-to-build> # compile only a subset of the tree

### MANIPULATING MODULES
modinfo <module_name> # see information about module of given name
insmod <module_file.ko> # loads module at given location
rmmod <module_name> # unloads module of given name
modprobe <module_name> # loads module of given name and its dependencies
modprobe -r <module_name> # unloads module of given name
depmod --quick # updates the module dependency list only if a module is added or removed

### SEE KERNEL LOGS
dmesg | tail # see last logs
Introduction
Kernel modules are code segments that can be dynamically inserted into or removed from the kernel as needed. They enhance the kernel’s capabilities without requiring a system reboot. A prime example is a device driver module, which enables the kernel to communicate with connected hardware. Without modules, systems typically rely on monolithic kernels, where new features must be directly incorporated into the kernel image. This results in larger kernel sizes and demands recompilation and a system restart whenever additional functionality is introduced.
Starting to tinker with the Linux codebase through modules is interesting as we can have an isolated context to understand other concepts about Linux development, and this is precisely what we will do in this tutorial.
Introduction to Linux kernel build configuration and modules
This part shows how to build and test a simple kernel module and explores the Linux kernel build configuration further by explaining how to use menuconfig to enable kernel features and how to create your own build configuration for a simple example module.
Summary of the parts of this tutorial:
- Creating a simple example module
- Creating Linux kernel configuration symbols
- Configuring the Linux kernel build with menuconfig
- Installing Linux kernel modules
- Dependencies between kernel features
1) Creating a simple example module
Don’t forget to have the activate.sh script built in the last tutorials
running.
From the root of the Linux kernel source code, create the file
${IIO_TREE}/drivers/misc/simple_mod.c and add the code for the simple mod in
there.
#include <linux/module.h>
#include <linux/init.h>

static int __init simple_mod_init(void)
{
	pr_info("Hello world\n");
	return 0;
}

static void __exit simple_mod_exit(void)
{
	pr_info("Goodbye world\n");
}

module_init(simple_mod_init);
module_exit(simple_mod_exit);

MODULE_LICENSE("GPL");
2) Creating Linux kernel configuration symbols
Now, let’s create a Kconfig configuration symbol for our simple module and add
the associated Kbuild configuration option to build it.
When adding new Kconfig symbols we usually write them in the Kconfig file
that stands in the same directory of the thing we want to build.
The simple_mod.c module is under ${IIO_TREE}/drivers/misc/ so we will add a configuration
symbol for that in ${IIO_TREE}/drivers/misc/Kconfig.
When adding entries to kbuild Kconfig and Makefiles we also follow the convention of keeping the entries in alphabetical order. The convention is not enforced by the build system so out of order entries will not prevent us from building the kernel. Nevertheless, keeping entries in order definitely helps developers find build configurations when looking for them. Also, the Linux kernel community will ask code submitters to keep things organized when upstreaming new configuration symbols. Let’s keep the good practices.
config SIMPLE_MOD
	tristate "Simple example Linux kernel module"
	default	n
	help
	  This option enables a simple module that says hello upon load and
	  bye on unloading.
The config keyword defines a new configuration symbol. Further, Kbuild will generate a configuration option for that symbol which in turn will be stored as a configuration entry in the .config file. Configuration options will also show in kernel configuration tools such as menuconfig, nconfig, or during the compilation process. In particular, the SIMPLE_MOD configuration symbol has the following attributes:
- tristate: the type for the configuration option. It declares that this symbol stands for something that may be compiled as a module (m), built-in compiled (y) (i.e., included in the kernel image), or not compiled at all (n). The type definition also accepts an optional input prompt to set the option name that kernel configuration tools display.
- default: the value that should be selected by kernel config tools if no explicit value has been assigned to the associated configuration option (such as when applying a defconfig).
- help: defines a help text to be displayed as auxiliary info.
Other common attributes for configuration symbols are:
- bool: type for features that can only be either enabled or disabled.
- depends on: list of dependency symbols. If its dependencies are not satisfied, this symbol may become non-visible during configuration or compilation time. As an experiment, try to disable SPI support at Device Drivers. Many ADCs will no longer be listed at Device Drivers -> Industrial I/O support -> Analog to digital converters.
- select: when the symbol containing the select list is enabled, the symbols from its select list will also be enabled. Note the symbols in this list will not be disabled if the symbol containing the select list is later disabled.
Now we add the simple_mod module to the list of build objects in
${IIO_TREE}/drivers/misc/Makefile.
obj-$(CONFIG_SIMPLE_MOD) += simple_mod.o
That’s all we need for enabling the configuration of our simple_mod with kbuild.
3) Configuring the Linux kernel build with menuconfig
Run menuconfig and enable our example module.
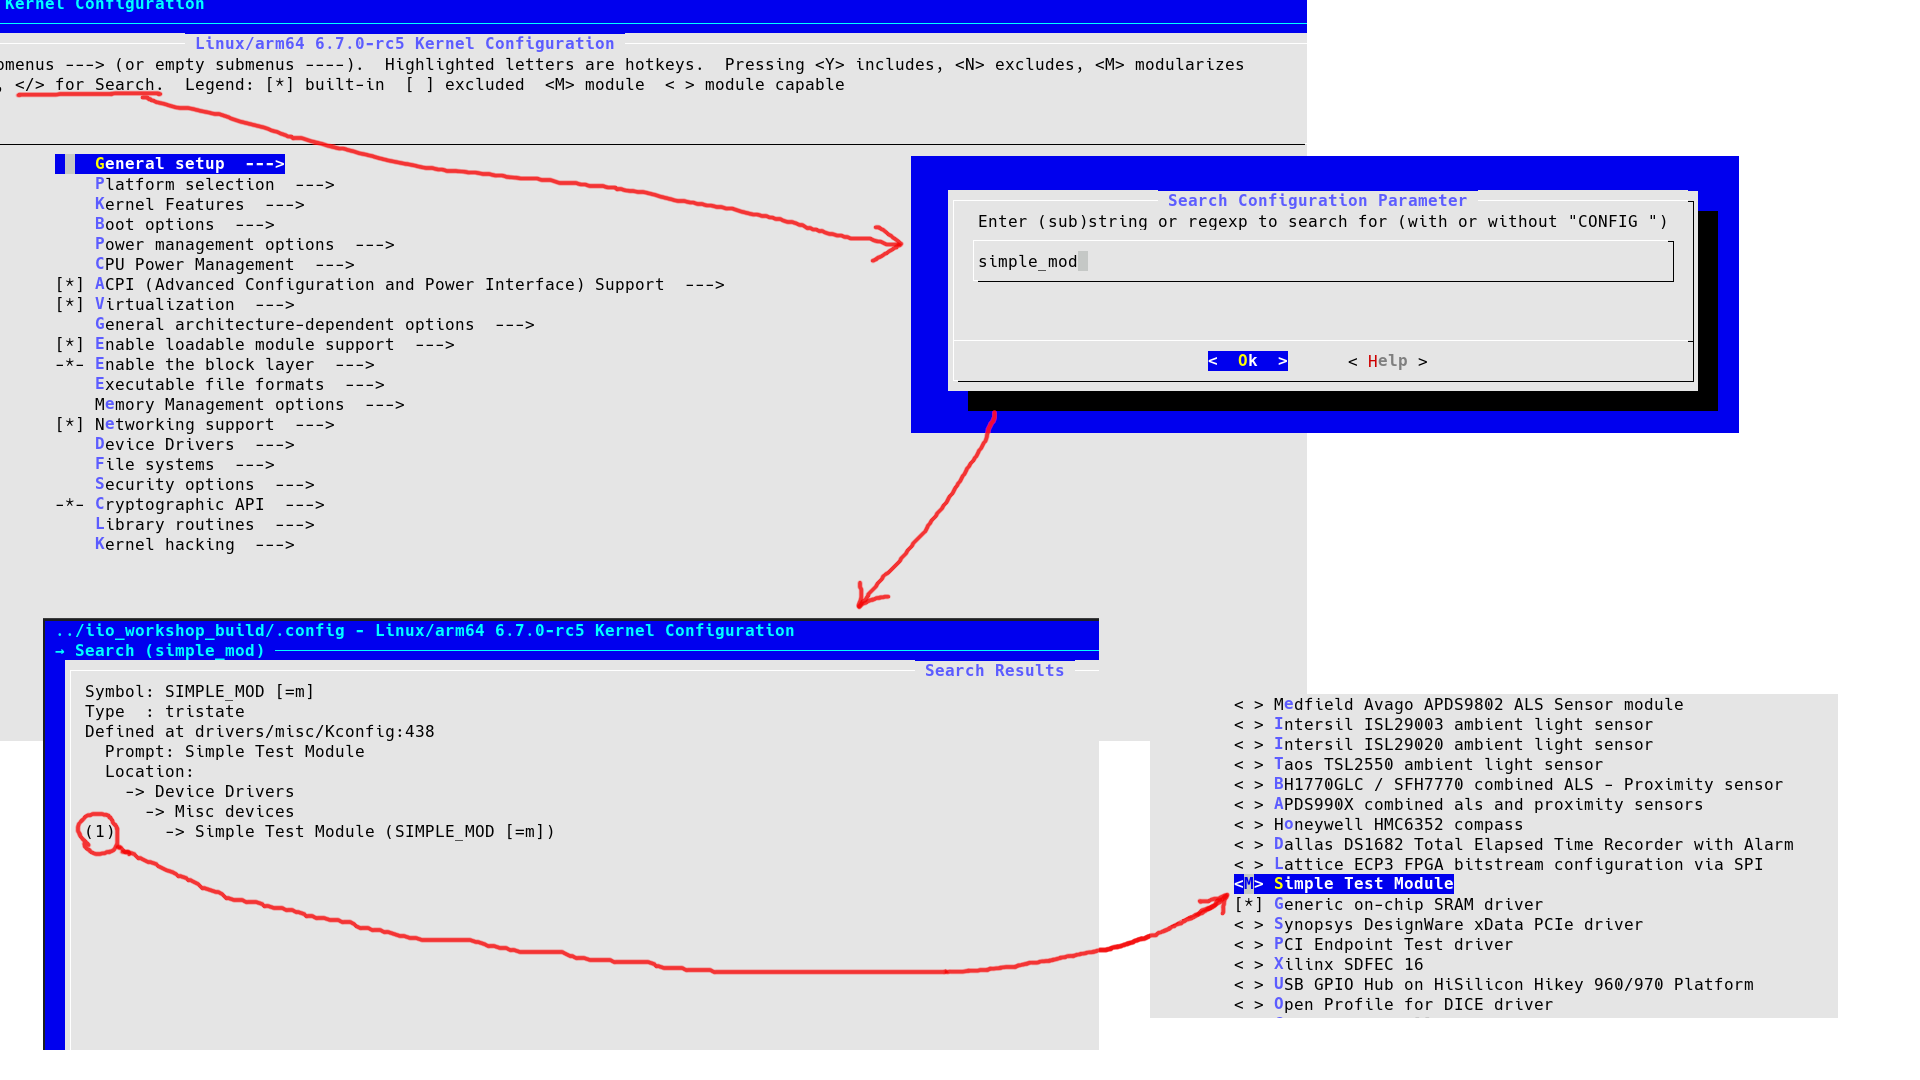
make -C "$IIO_TREE" menuconfig
Type forward slash (/) to search by symbol name. In the search screen, type simple_mod then enter. The description of the simple_mod will appear. Type 1 to go to the configuration option. With selection over the simple_mod option, type m to enable it as a module. Save the configuration and exit menuconfig.
Before building the image and modules, let’s clean any artifacts from previous compilations. This isn’t strictly necessary, but it helps us ensure we are on the same page as much as possible.
-
cd "$IIO_TREE" kw build --clean -
make -C "$IIO_TREE" -j$(nproc) clean
Build image and modules again.
-
cd "$IIO_TREE" kw build -
make -C "$IIO_TREE" -j$(nproc) Image.gz modules
Install new kernel modules. No need to copy or install the kernel image since
virt will pick the generated image file at ${IIO_TREE}/arch/arm/boot/Image.
-
mkdir "${VM_DIR}/arm64_rootfs" ### ADAPT THE COMMAND BELOW ### sudo guestmount --rw --add "${VM_DIR}/arm64_img.qcow2" --mount /dev/<rootfs> "${VM_DIR}/arm64_rootfs" # mount the VM `rootfs` to the given mount point in read and write mode (this could take a while) sudo --preserve-env make -C "${IIO_TREE}" INSTALL_MOD_PATH="${VM_DIR}/arm64_rootfs" modules_install # install modules to inside the VM sudo guestunmount "${VM_DIR}/arm64_rootfs" # unmount the VM `rootfs` -
### ADAPT THE COMMAND BELOW ###
sudo guestmount --rw --add "${VM_DIR}/arm64_img.qcow2" --mount /dev/<rootfs> "${VM_MOUNT_POINT}" # mount the VM `rootfs` to the given mount point in read and write mode (this could take a while)
sudo --preserve-env make -C "${IIO_TREE}" modules_install # install modules to inside the VM
sudo guestunmount "$VM_MOUNT_POINT" # unmount the VM `rootfs`
Connect to the VM with ssh.
-
sudo virsh start arm64 kw ssh -
sudo virsh start arm64
sudo virsh start arm64
sudo virsh net-dhcp-leases default
ssh root@<VM-IP-address>
Verify the kernel version.
@VM
uname --all
cat /proc/version
4) Installing Linux kernel modules
Run modinfo which shows main info related to a kernel module. When known, modinfo will show the module file name, module author, module description, license, ailas, dependencies, signature, and signer.
@VM
modinfo simple_mod
List currently loaded kernel modules.
@VM
lsmod
You should have an output in similar to the below.
root@localhost:~# lsmod
Module                  Size  Used by
crct10dif_ce           12288  1
cfg80211              409600  0
rfkill                 28672  2 cfg80211
drm                   577536  0
dm_mod                131072  0
ip_tables              28672  0
x_tables               40960  1 ip_tables
Notice our simple_mod is not loaded. Let’s take care of it. There are two ways of loading a Linux kernel module: insmod and modprobe.
insmod takes a path to a module file (.ko) and loads that into the running kernel. The kernel object file doesn’t really need to have been installed as we did with modules_install. rmmod unloads the module. Load our example module with insmod.
@VM
insmod /lib/modules/$(uname -r)/kernel/drivers/misc/simple_mod.ko # loads module at given location
Then run dmesg to see kernel log messages. You should have something like this
root@localhost:~# dmesg | tail
<snipped>
[ 3962.547283] Hello world
Remove the module with rmmod.
@VM
rmmod simple_mod # unloads module of name `simple_mod`
Then run dmesg again to see kernel log messages. You should have something like this
root@localhost:~# dmesg | tail
<snipped>
[ 3973.986089] Goodbye world
We can do the same with modprobe.
@VM
modprobe simple_mod # loads module of name `simple_mod`
dmesg | tail
modprobe -r simple_mod # unloads module of name `simple_mod`
dmesg | tail
Instead of a module file, modprobe takes the module name as argument. For that to work, the module has to be installed within the kernel and module tracking files (such as modules.dep) must contain references to the requested module. The advantage of having that is that modprobe will look for module dependencies and (if any) properly load them before loading the requested module [1]. insmod does not check for any module dependencies.
5) Dependencies between kernel features
Let’s increment our example module to export a function that can be called by other modules.
#include <linux/module.h>
#include <linux/init.h>

void simple_mod_func(void);

void simple_mod_func(void)
{
	pr_info("Called %s, %s function\n", KBUILD_MODNAME, __func__);
}
EXPORT_SYMBOL_NS_GPL(simple_mod_func, "IIO_WORKSHOP_SIMPLE_MOD");

static int __init simple_mod_init(void)
{
	pr_info("Hello from %s module\n", KBUILD_MODNAME);
	return 0;
}

static void __exit simple_mod_exit(void)
{
	pr_info("Goodbye from %s\n", KBUILD_MODNAME);
}

module_init(simple_mod_init);
module_exit(simple_mod_exit);

MODULE_LICENSE("GPL");
Rebuild the example module and copy it to the virtual machine.
-
cd "$IIO_TREE" kw build kw ssh --send drivers/misc/simple_mod.ko -
make -C "$IIO_TREE" M="${IIO_TREE}/drivers/misc/"
scp "${IIO_TREE}/drivers/misc/simple_mod.ko" root@<VM-IP-address>:~/
The M= option specify a directory for external module build. With that, we can
only rebuild the modules of a child directory such as
${IIO_TREE}/drivers/misc. Inside the virtual machine, test the new
simple_mod version. No need to reboot.
Inside the VM, do
@VM
cp simple_mod.ko /lib/modules/`uname -r`/kernel/drivers/misc/
depmod --quick
modprobe simple_mod
modprobe -r simple_mod
dmesg | tail
Now, let’s add another module to call the exported simple_mod function. Create
a file ${IIO_TREE}/drivers/misc/simple_mod_part.c with the following contents.
#include <linux/module.h>
#include <linux/init.h>

extern void simple_mod_func(void);

static int __init simple_mod_part_init(void)
{
	pr_info("Hello from %s module\n", KBUILD_MODNAME);
	simple_mod_func();
	return 0;
}

static void __exit simple_mod_part_exit(void)
{
	pr_info("Goodbye from %s\n", KBUILD_MODNAME);
}

module_init(simple_mod_part_init);
module_exit(simple_mod_part_exit);

MODULE_LICENSE("GPL");
MODULE_IMPORT_NS("IIO_WORKSHOP_SIMPLE_MOD");
Also add entries to ${IIO_TREE}/drivers/misc/Kconfig and
${IIO_TREE}/drivers/misc/Makefile as we did for simple_mod.
config SIMPLE_MOD_PART
	tristate "Simple Test Partner Module"
	depends on SIMPLE_MOD
	help
	   Enable this configuration option to enable the simple test partern
	   module.
obj-$(CONFIG_SIMPLE_MOD_PART) += simple_mod_part.o
Run menuconfig again to enable simple_mod_part to build as a module.
make -C "$IIO_TREE" menuconfig
You will notice though, if you try to build the modules with
make M=drivers/misc/ that it will build simple_mod but won’t build
simple_mod_part. To get simple_mod_part built and setup as we have
simple_mod, run the modules_prepare rule. Alternatively, we can rebuild the
kernel and install the modules again. Let’s go for the first option which is
faster.
-
cd "$IIO_TREE" kw build kw ssh --send drivers/misc/simple_mod_part.ko -
make -C "$IIO_TREE" modules_prepare
make -C "$IIO_TREE" M=drivers/misc/
scp "${IIO_TREE}/drivers/misc/simple_mod_part.ko" root@<VM-IP-address>:~/
Load simple_mod_part and check out the output in kernel logs.
@VM
cp simple_mod_part.ko /lib/modules/`uname -r`/kernel/drivers/misc/
depmod --quick
modinfo simple_mod_part
modprobe simple_mod_part
modprobe -r simple_mod_part
dmesg | tail
You should have an output like
root@localhost:~# dmesg | tail
[  119.775025] Hello from simple_mod module
[  119.777102] Hello from simple_mod_part module
[  119.777290] Called simple_mod, simple_mod_func function
[  128.551064] Goodbye from simple_mod_part
[  128.563960] Goodbye from simple_mod
Note you don’t have to explicitly ask to load simple_mod if using modprobe. To summarize, when adding new modules we need to prepare them for inclusion or rebuild the whole kernel to get the modules correctly setup. After the modules have been setup, we can modify modules, build only those that were updated, copy them to the VM, update module dependancies with depmod, then test.
Proposed Exercices
-
The .config file that comes with the arm64 VM is bloated with features built together with the kernel image (y config value) which is why even after
make localmodconfigthe .config file did not reduce significantly and the build took a lot of time. Runmake allmodconfigto turn builtin configuration values into module values when possible. After that, boot the VM, regenerate the list of needed modules as described in Part 1, runmake localmodconfigwith new list of modules. Did it reduce .config size further? How much? Does the whole kernel build take less time with the new .config? Does the resulting kernel still boot? -
Sometimes developers lose track of what .config was used to generate a running kernel after messing arround for enough time. The in kernel configuration config (IKCONFIG) exports (imports?) the .config file used to build the kernel into the kernel image and make it later availabe as /proc/config.gz file. Enable IKCONFIG, rebuild the kernel and read your .config from /proc/config.gz within the VM.
-
Customize the log messages for simple_mod and simple_mod_part. Add
#define pr_fmt(fmt) KBUILD_MODNAME ": " fmtat the top of the module source files. KBUILD_MODNAME will expand to the module source file name resulting in every message logged throughpr_info()(and friends) being prepended by the module name. See include/linux/printk.h for documentation. Tip, add the above define before header inclusions to avoid build warnings.
Conclusion
This tutorial described how to add a module to the Linux codebase, create a configuration for it, enable it to be compiled as a module, and install it. We also covered how to dynamically load and unload modules, and how to use modules functionalities in other modules.
History
- V1: Release
- V2: Review for the Free Software Development course offered in 2025-1 at IME-USP
comments powered by Disqus