Building and booting a custom Linux kernel for ARM
Written by Marcelo Schmitt
Written on , last modified onThis tutorial describes how to build - in other words, compile - the Linux kernel for the ARM architecture and boot test it in a Virtual Machine (VM). Basic kernel build configuration is covered too.
This tutorial was originally thought to be part of a set of tutorials tailored to aid newcomers to develop for the Linux kernel Industrial I/O subsystem (IIO). It is the second in the series and a continuation of the “Setting up a test environment for Linux Kernel Dev using QEMU and libvirt” tutorial.
Command Summary
Skip this section if you have not completed this tutorial yet. This is a reference for those who have gone through this tutorial and want to remember specific commands.
### SHALLOWLY CLONING THE IIO TREE W/ ACTIVE DEVELOPMENT BRANCH
git clone git://git.kernel.org/pub/scm/linux/kernel/git/jic23/iio.git "${IIO_TREE}" --branch testing --single-branch --depth 10

### CREATING A LEAN `.config` file
make -C "$IIO_TREE" defconfig # create predefined defconfig
make -C "$IIO_TREE" olddefconfig # update defconfig with new default values
make -C "$IIO_TREE" localmodconfig # reduce compilation to minimal set of modules

### SAFELY MODIFYING THE `.config` W/ A TUI
make -C "$IIO_TREE" nconfig

### BUILDING A LINUX KERNEL FROM SOURCE CODE
make -C "$IIO_TREE" -j$(nproc) Image.gz modules

### MOUNTING VM `rootfs` AND INSTALLING MODULES
sudo guestmount --rw --add "${VM_DIR}/arm64_img.qcow2" --mount /dev/<rootfs> "${VM_MOUNT_POINT}" # mount the VM `rootfs` to the given mount point in read and write mode (this could take a while)
sudo --preserve-env make -C "${IIO_TREE}" modules_install # install modules to inside the VM
sudo guestunmount "$VM_MOUNT_POINT" # unmount the VM `rootfs`
Introduction
After setting up a test environment with VMs using QEMU and libvirt, we
begin compiling (also called building) a custom Linux kernel from source and
booting it. This involves taking the source code developed by the Linux
community, compiling it into a monolithic executable that can be loaded into
memory and run on hardware (virtualized or not), and using it to start a system.
Additionally, we will compile and install kernel modules, smaller units that can
be dynamically loaded and unloaded while the system is running.
Cross-compilation will also be a factor, as we assume that the machine used to
compile the source code to these artifacts has an AMD64 architecture, while the
target architecture is ARM64.
Configuring, building, and booting a custom Linux kernel
In this section we will go through the steps on how to configure, compile, and boot customized Linux images in ARM64 VMs.
Summary of this tutorial:
- Cloning a Linux kernel tree
- Configuring the Linux kernel compilation
- Building a custom Linux kernel
- Installing modules and booting the custom-built Linux kernel
Before proceding remember to have the activate.sh script we’ve created
available to be modified and active for all the commands run in the host system.
Also assure that you have your testing environment set up from the last
tutorial.
1) Cloning a Linux kernel tree
There are several repositories that contain the source code for the Linux kernel. These repositories are known as Linux kernel trees, in short, kernel trees or just trees, because, as every software project, its source code is arranged in a tree-like file hierarchy. Some trees are widely known such as Linus Torvalds’ tree (known as mainline) that represent the most updated official version of Linux and the Linux stable tree that represents the stable releases (the 6.10, 6.11, 6.12, etc.). In general, a Linux tree is a repository where some development for the kernel happens and each tree follows its own development ruled by its own community. Many of those repos are at kernel.org.
Some examples of Linux kernel trees are:
- Linus Torvalds’ tree (mainline)
- Linux-stable tree
- Linux-next tree
- IIO subsystem tree
- Raspberry Pi tree
- Analog Devices tree
For this workshop, we’ll be using the Industrial I/O (IIO) subsystem tree so
download (clone) it with git. First, modify your activate.sh script
--- a/activate.sh
+++ b/activate.sh
@@ -4,6 +4,7 @@
 export LK_DEV_DIR='/home/lk_dev' # path to testing environment directory
 export VM_DIR="${LK_DEV_DIR}/vm" # path to VM directory
 export BOOT_DIR="${VM_DIR}/arm64_boot" # path to boot artifacts
+export IIO_TREE="${LK_DEV_DIR}/iio" # path to IIO subsystem Linux kernel tree

 # utility functions
then rerun the activate.sh script and clone the tree.
git clone git://git.kernel.org/pub/scm/linux/kernel/git/jic23/iio.git "${IIO_TREE}" --branch testing --single-branch --depth 10
In terms of source code, Linux kernel trees are already huge (a couple of GB in
disk space), but the git history is even bigger at this point (around 5GB). To
(hopefully) not use too much disk space and avoid longer download times, we use
the --branch option, which tells git we want the testing branch of the
remote pointed by the URL, and the --depth=10 option, which limits the git
history to the latest 10 commits in the branch to be fetched. We’ve chosen the
testing branch instead of the default master because the former is where the
actual development happens. Hence, as in this series, we aim to (possibly)
develop and propose changes to IIO, the testing branch is the one we are
interested in.
If you have plenty of disk space (and probably some spare time), I suggest you
clone the tree without the --branch and --depth flags because commit logs
are often a good source of information when trying to understand kernel code. By
the time this post was written, the IIO tree (with its entire git history) was
sizing roughly 5GB.
2) Configuring the Linux kernel compilation
The Kernel Build System (kbuild) is based on make and other GNU tools and
allows a highly modular and customizable build process for the Linux kernel. By
default, kbuild uses the configuration options stored in the .config file
under the root directory of the Linux kernel tree, which isn’t present in
a freshly cloned tree. Those options hold values for configuration symbols
associated with kernel resources such as drivers, tools, and features in
general. Nearly all directories inside a kernel tree have a Kconfig file,
which defines the symbols for the resources at the same level. Top Kconfig
files include (source) Kconfig files from subdirectories thus creating a
tree of configuration symbols. When needed, kbuild generates configuration
options from Kconfig symbols and stores their values in a .config file.
kbuild Makefiles then use these configuration values to compile code
conditionally and to decide which objects to include in the monolithic kernel
image and which objects to become modules
[1]
[2].
There are predefined .configs for building kernels for different architectures
and purposes. These are called defconfig (default configuration) files.
defconfig files store only specific non-default values for configuration
symbols. For instance, one can find defconfig files for ARM architecture
machines under arch/arm/configs. We will create a .config file from the
arm64 defconfig. For it, we must specify our target architecture for the
build. Once again, modify the activate.sh script and rerun it.
--- a/activate.sh
+++ b/activate.sh
@@ -5,6 +5,8 @@ export LK_DEV_DIR='/home/lk_dev' # path to testing environment directory
 export VM_DIR="${LK_DEV_DIR}/vm" # path to VM directory
 export BOOT_DIR="${VM_DIR}/arm64_boot" # path to boot artifacts
 export IIO_TREE="${LK_DEV_DIR}/iio" # path to IIO subsystem Linux kernel tree
+## Linux kernel tree build variables
+export ARCH=arm64 # variable defining target architecture

 # utility functions
Then create the .config defconfig file for the ARM architecture.
make -C "$IIO_TREE" defconfig # create predefined defconfig
make -C "$IIO_TREE" olddefconfig # update defconfig with new default values
ls -alFh "${IIO_TREE}/.config" # list file infos of generated `.config`
The -C option, like with git, tells make to run the commands as if it was in
the path passed as value. This series of tutorials does this (and other things)
to avoid requiring commands to be run in implied directories. Ideally, you
should always be aware of where you are executing a command and if it makes
sense. Nevertheless, to avoid unexpected troubles, we present make commands
with “mistake mitigation” flags.
Before moving forward, let’s start the VM running ARM64, which we set up in the
last tutorial. Note that if either libvirtd, the default network, or the VM
are already started, some commands will raise errors, indicating that these are
already active.
@host
sudo systemctl start libvirtd # starts the libvirt daemon
sudo virsh net-start default # starts `virsh` default network
sudo virsh start --console arm64 # start a registered instance attaching console
After the VM is running, fetch the saved list of modules you’ve generated in the first tutorial of the series. Refer to section 4 of the first tutorial, in case you don’t have this file.
@host
sudo virsh net-dhcp-leases default # list `default` network to get VM IP
scp root@<VM-IP-address>:~/vm_mod_list "${IIO_TREE}" # copy VM modules list to IIO tree
Now, use this file to make a minimal set of modules selected for compilation,
thus reducing the time to build the kernel and the amount of VM disk space
required to install the modules. First, modify and rerun the activate.sh
script
--- a/activate.sh
+++ b/activate.sh
@@ -7,6 +7,7 @@ export BOOT_DIR="${VM_DIR}/arm64_boot" # path to boot artifacts
 export IIO_TREE="${LK_DEV_DIR}/iio" # path to IIO subsystem Linux kernel tree
 ## Linux kernel tree build variables
 export ARCH=arm64 # variable defining target architecture
+export LSMOD="${IIO_TREE}/vm_mod_list" # path to list of minimal set of modules

 # utility functions
then, optimize the .config file with the minimal set of modules to be built
make -C "$IIO_TREE" localmodconfig
New options might be prompted due to the differences in the files. You can just
spam the ENTER key for the default values.
It is possible to open the .config file and directly edit it, but this isn’t
recommended. A safer and more palatable way is to use one of the Terminal
User Interfaces (TUI) provided by the Linux project
make -C "$IIO_TREE" nconfig
Use the arrow keys to navigate and ENTER to change/toggle a configuration. You
can take some time to familiarize with these menus and see the available
configurations.
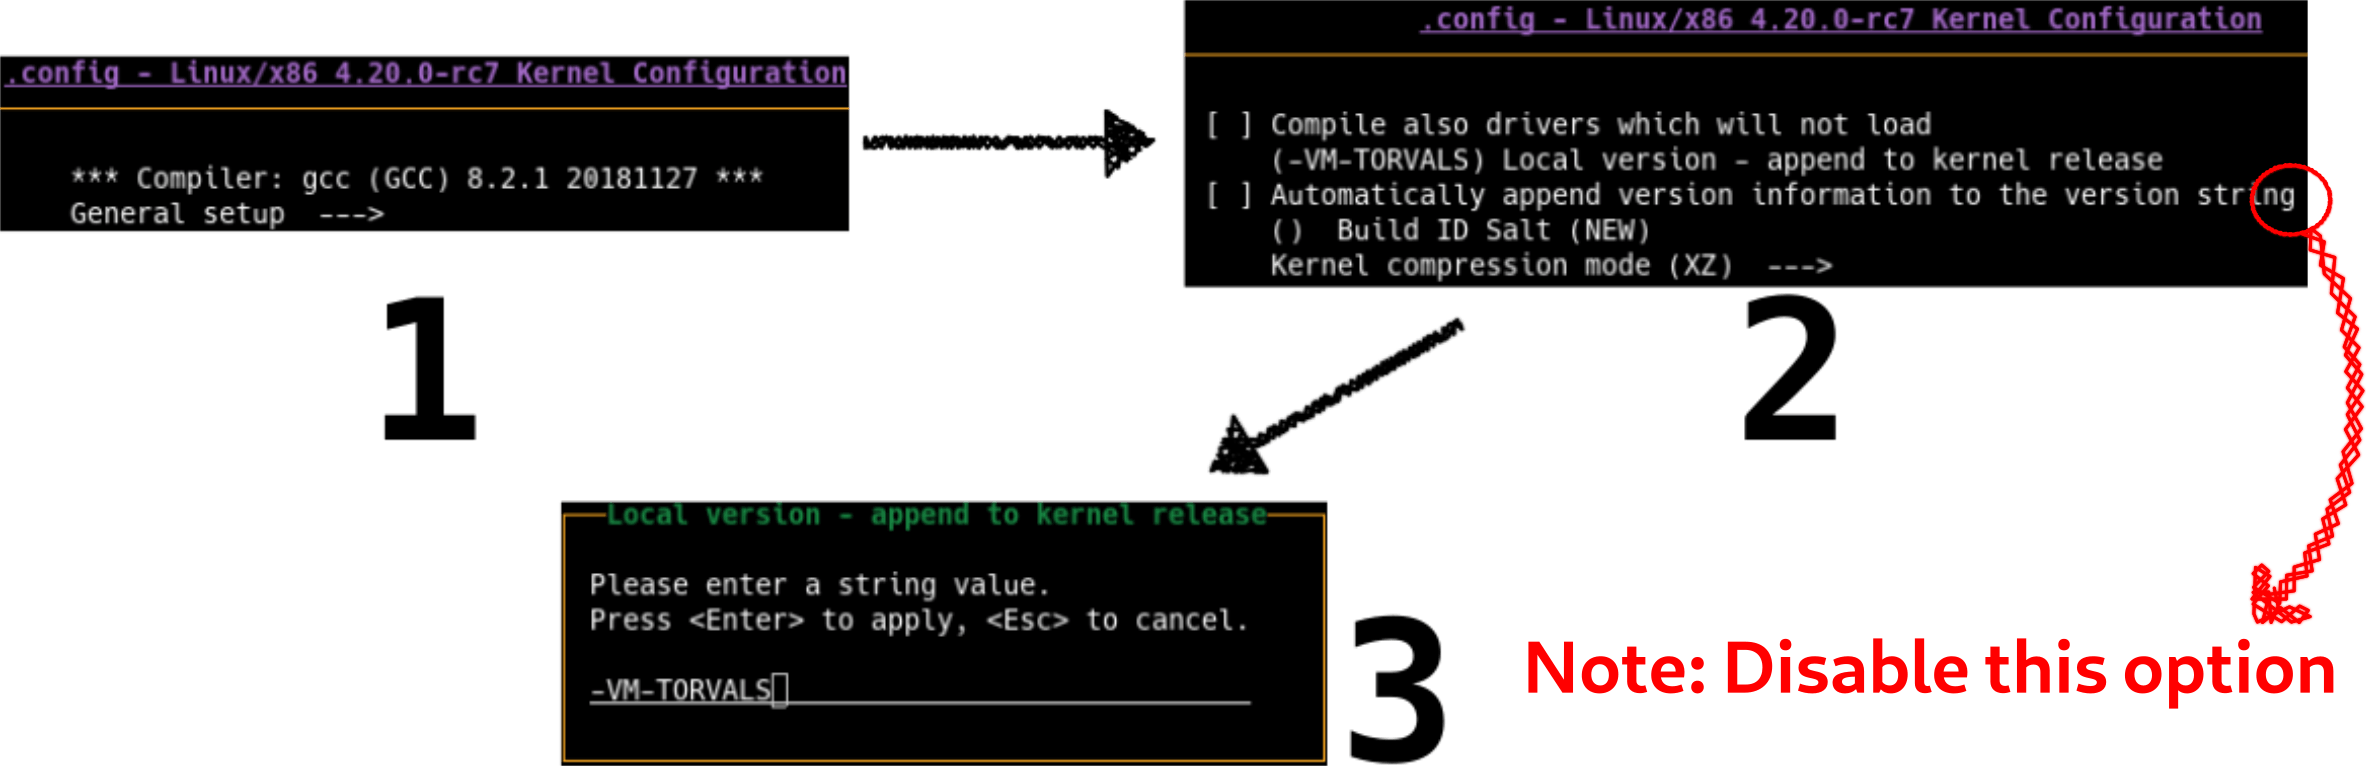
For this tutorial, we want to make a tiny customization: change the kernel image name. In the menu, select General setup, then in Local version - append to kernel release, put whatever you want to be appended after the kernel version, and disable Automatically append version information to the version string. Be aware that the string you input will be part of the name of your first custom kernel, so treat it well :)
To exit, hit F9, which will prompt you to save the changes. The figure below
illustrates the steps.
nconfig
3) Building a custom Linux kernel
Different processor architectures have distinct instruction sets and register names. Due to that, the binaries produced by a compiler for architecture A will not work on a machine of architecture B. So, we need to use a compiler that produces binaries compatible with the instruction set of the machine we want to run our kernel. Essentially, this concept is called Cross-Compilation.
In our case, we assume we have a development system of the AMD64 (x86_64) architecture, and the target machine is a VM of the ARM64 architecture.
Most distros should have a GCC package with a compiler for AMD64 host machines
that produces binaries for ARM64 targets. On Debian and Fedora, the package name
is gcc-aarch64-linux-gnu, while in Arch the package name is
aarch64-linux-gnu-gcc.
# Arch-based distros
sudo pacman -Syy && sudo pacman -S aarch64-linux-gnu-gcc
# Debian-based distros
sudo apt update && sudo apt install gcc-aarch64-linux-gnu
# Fedora-based distros
sudo dnf update && sudo dnf install gcc-aarch64-linux-gnu
See the Complementary Commands section for advice if you are having difficulties in finding an equivalent package to your distro.
Modify the activate.sh script (don’t forget to rerun it) to include a env
variable that defines our cross-compiler
--- a/activate.sh
+++ b/activate.sh
@@ -5,10 +5,12 @@ export IIO_TREE="${LK_DEV_DIR}/iio" # path to IIO subsystem Linux kernel tree
 ## Linux kernel tree build variables
 export ARCH=arm64 # variable defining target architecture
 export LSMOD="${IIO_TREE}/vm_mod_list" # path to list of minimal set of modules
+export CROSS_COMPILE=aarch64-linux-gnu- # cross-compiler

# utility functions
The kernel has many build targets, though we will only use the Image.gz and
modules targets. Use make help to view a list of available targets. Finally,
let’s build our custom Linux kernel from source code. Mind that, although we
made a really lean .config, compiling the kernel still is a heavy task, and
even more so when cross-compiling.
make -C "$IIO_TREE" -j$(nproc) Image.gz modules
It is likely that the above command will fail due to the software required for
the build being missing. Yet, kbuild does a good job of telling what is
missing from the Linux build. So, one may often identify what to install after
analyzing the errors in the build output. On Debian-based OSes, developers often
need to install flex, bison, and ncurses.
There is also a minimal requirements to compile the kernel page with a list of software required to build Linux and how to check your system has the minimal required versions of them.
The make command will instruct kbuild Makefiles to start the build process.
The main goal of the kbuild Makefiles is to produce the kernel image
(vmlinuz) and modules [2]. Akin to
Kconfig files, kbuild Makefiles are also present in most kernel directories,
often working with the values assigned for the symbols defined by the former.
The whole build is done recursively — a top Makefile descends into its sub- directories and executes each subdirectory’s Makefile to generate the binary objects for the files in that directory. Then, these objects are used to generate the modules and the Linux kernel image. [1]
If everything goes right, you should see an arch/arm64/boot/Image,
modules.order and alike files under the Linux source root directory.
4) Installing modules and booting the custom-built Linux kernel
Before booting the custom-built kernel, we need to install the modules into the
VM, i.e., we need to move the module objects compiled to the right place inside
the VM’s filesystem. To do this, we mount the VM rootfs (it should be the same
sdaX partition from the first tutorial), which essentially attaches the
virtual disk representing the rootfs into a mount point that can be accessed
by our host filesystem.
First, alter the activate.sh script to include an env variable for the mount
point and the path to install the modules used by the make command we will
run.
--- a/activate.sh
+++ b/activate.sh
@@ -5,10 +5,12 @@ export LK_DEV_DIR='/home/lk_dev' # path to testing environment directory
 export VM_DIR="${LK_DEV_DIR}/vm" # path to VM directory
 export BOOT_DIR="${VM_DIR}/arm64_boot" # path to boot artifacts
 export IIO_TREE="${LK_DEV_DIR}/iio" # path to IIO subsystem Linux kernel tree
+export VM_MOUNT_POINT="${VM_DIR}/arm64_rootfs" # path to mount point for VM rootfs
 ## Linux kernel tree build variables
 export ARCH=arm64 # variable defining target architecture
 export LSMOD="${IIO_TREE}/vm_mod_list" # path to list of minimal set of modules
 export CROSS_COMPILE=aarch64-linux-gnu- # cross-compiler
+export INSTALL_MOD_PATH="$VM_MOUNT_POINT" # path to install modules inside VM

 # utility functions
Rerun the activate.sh script, then create a mount point, mount the VM, and
install the modules. The commands below are being run with superuser privileges
due to actions related to mounting, manipulating mounted directories, and
unmounting not being available for normal users. ASSURE THAT THE VM IS SHUT
DOWN BEFORE PROCEEDING.
mkdir "$VM_MOUNT_POINT" # creates mount point
### ADAPT THE COMMAND BELOW ###
sudo guestmount --rw --add "${VM_DIR}/arm64_img.qcow2" --mount /dev/<rootfs> "${VM_MOUNT_POINT}" # mount the VM `rootfs` to the given mount point in read and write mode (this could take a while)
sudo --preserve-env make -C "${IIO_TREE}" modules_install # install modules to inside the VM
sudo guestunmount "$VM_MOUNT_POINT" # unmount the VM `rootfs`
ASSURE THAT THE VM ROOTFS IS UNMOUNTED BEFORE PROCEDING.
Finally, update your activate.sh script to boot the VM (both through pure
QEMU and with libvirt) with the custom-built kernel. Don’t forget to adapt
the modification to have the correct initrd and the correct vda partition
depending on your VM particularities!
--- a/activate.sh
+++ b/activate.sh
@@ -23,7 +23,7 @@ function launch_vm_qemu() {
         -smp 2 \
         -netdev user,id=net0 -device virtio-net-device,netdev=net0 \
         -initrd "${BOOT_DIR}/<initrd>" \
-        -kernel "${BOOT_DIR}/<kernel>" \
+        -kernel "${IIO_TREE}/arch/arm64/boot/Image" \
         -append "loglevel=8 root=/dev/<vdaX> rootwait" \
         -device virtio-blk-pci,drive=hd \
         -drive if=none,file="${VM_DIR}/arm64_img.qcow2",format=qcow2,id=hd \
@@ -41,7 +41,7 @@ function create_vm_virsh() {
         --import \
         --features acpi=off \
         --disk path="${VM_DIR}/arm64_img.qcow2" \
-        --boot kernel=${BOOT_DIR}/<kernel>,initrd=${BOOT_DIR}/<initrd>,kernel_args="loglevel=8 root=/dev/<vdaX> rootwait" \
+        --boot kernel=${IIO_TREE}/arch/arm64/boot/Image,initrd=${BOOT_DIR}/<initrd>,kernel_args="loglevel=8 root=/dev/<vdaX> rootwait" \
         --network bridge:virbr0 \
         --graphics none
 }
Rerun the activate.sh script. We need to undefine our libvirt managed VM,
then created it again
@host
sudo virsh undefine arm64
create_vm_virsh
Log into the VM and run
@VM
uname --kernel-release
to check that you are now running the custom kernel we just built. The output of this command should be something in the format of
<major-release-nr>.<minor-release-nr>.<patch-release-nr>-rc<one-through-eight>-<the-name-you-wrote>+
like, for example,
6.14.0-rc1-free-software+
Congratulations, you’ve just compiled and boot-tested a Linux kernel! From now on, whenever you make a change on the Linux kernel tree, you can “just” compile it, install the modules, and then start the VM to boot the new custom kernel and be able to run validations inside the testing environment!
4.1) Installing the kernel image
Often, kernel developers also need to explicitly install the Linux kernel image to their target test machines. Notice that here, we are not copying or moving the Linux kernel image to nowhere inside the VM like we did when installing modules. Neither we are dealing with a physical machine.
Essentially, installing a new kernel image would be to just replace the
vmlinuz/Image/zImage/bzImage/uImage file, which contains the Linux boot
executable program. However, some platforms (such as AMD64 and ARM64) have fancy
boot procedures with boot loaders that won’t find kernel images without very
specific configuration pointing to them (e.g., GRUB), which might mount
temporary file systems (initrd), load drivers prior to mounting the rootfs,
and so on. To help setup those additional boot files and configuration, the
Linux kernel has a install rule. So, kernel developers may also run make
install or make install INSTALL_PATH=<path_to_bootfs> when deploying kernels
to those platforms.
For this setup, we shall not bother with that. We don’t need to run the
installation rule because we instructed QEMU (with -kernel) and libvirt
(with --boot kernel=...) to pick up the kernel image that resulted from the
compilation, and we are reusing the initrd file from the original guest OS
that came with the disk image.
Complementary Commands
One may also download cross compiler toolchains from different vendors. For instance, ARM provides an equivalent cross compiler that you may download if having trouble finding a proper distro package.
wget -O "${LK_DEV_DIR}/gcc-aarch64-linux-gnu.tar.xz" https://developer.arm.com/-/media/Files/downloads/gnu-a/10.3-2021.07/binrel/gcc-arm-10.3-2021.07-x86_64-aarch64-none-linux-gnu.tar.xz
tar -xf -C "$LK_DEV_DIR" "${LK_DEV_DIR}/gcc-aarch64-linux-gnu.tar.xz"
Sometimes identifying the cross compiler for your combination of host and target machines may require some understanding of what is called the compiler triplet. Conceptually, the compiler triplet should contain three fields: the name of the CPU family/model, the vendor, and the operating system name [3]. However, sometimes the vendor is omitted so one may find a triplet like x86_64-freebsd (FreeBSD kernel for 64-bit x86 CPUs) [3]. It is also common to see the operating system information split into two separate fields, one for indicating the kernel and the other for describing the runtime environment or C library which is being used. The the debian package for x86-64 gcc is an example of this triplet format mutation: gcc-x86-64-linux-gnu (compiler for 64-bit x86 targets that will run a Linux kernel and have GNU glibc in their runtime). But things can get even more unintuitive when system call conventions or Application Binary Interfaces (ABI) are specified in the OS field as in arm-linux-gnueabi (compiler for 32-bit ARM targets that will run Linux using the EABI system call convention) or as in arm-none-eabi (compiler for 32-bit ARM that will run no OS (bare-metal) using the EABI system call convention).
Anyways, you may point to the generic cross compiler name when using compilers
not under your PATH. For example:
export CROSS_COMPILE="${LK_DEV_DIR}/gcc-aarch64-linux-gnu/bin/aarch64-none-linux-gnu-"
Conclusion
This tutorial described how to configure and build a custom Linux kernel and
boot-test it into a VM. To accomplish that, we covered basic concepts of Linux
kernel build configuration to guide readers into generating feasible .config
files, and some cross-compilation concepts. By this point, you should be able to
configure, build, and boot-test a custom Linux kernel from source code in a
safe testing environment.
History
- V1: Release
- V2: Review for the Free Software Development course offered in 2025-1 at IME-USP
- V3: Incorporate Marcelo Schmitt feedbacks from Merge Request 135
References
[1] Javier Martinez Canillas. “Kbuild: the Linux Kernel Build System”. (2012) URL: https://www.linuxjournal.com/content/kbuild-linux-kernel-build-system. ⤴
[2] Michael Elizabeth Chastain and Kai Germaschewski and Sam Ravnborg. “Linux Kernel Makefiles”. (2023) URL: https://www.kernel.org/doc/html/latest/kbuild/makefiles.html. ⤴
[3] . “Target Triplet”. (2019) URL: https://wiki.osdev.org/Target_Triplet. ⤴
comments powered by Disqus